Posts

Given how stagnant Facebook ads targeting production has been the past couple of years, it’s nice to have some positive news about something added. Meta announced new B2B targeting options for your Facebook ads.

Let’s discuss what these options are and how you might use them.

The New Options

First, I admit that I had to read the descriptions for these first three options multiple times because they are so similar, and surely have overlap. Here are the definitions from Facebook…

  • IT decision-makers: A B2B audience segment that targets ads to people who are IT decision makers based on their job titles.
  • Business decision-maker titles and interests: A B2B audience segment that targets ads to people who are business decision-makers based on their job titles and interests.
  • Business decision-makers: A B2B audience segment that targets ads to people who are business decision-makers in engineering/IT, operations, HR, strategy or marketing, based on their job titles.

So…

1. “IT decision-makers” is a segment of people in the IT industry based on their job titles.
2. “Business decision-makers titles and interests” is a segment, industry agnostic, of business decision makers based on their job titles.
3. “Business decision-makers” is a segment of business decision-makers in several industries (including engineering and IT) based on their job titles.

Are you able to follow that? These are all decision makers based on their job titles. One is focused on IT, one includes several industries (including IT), and one is broadly “business.” The assumption is that #1 is the most narrow, followed by #3, and then #2. But we’ll get back to that later.

These job titles would all be pulled from a user’s profile. Of course, we don’t know how these job titles are segmented and determined to fall within each group.

Additionally, there are three options for targeting admins of new businesses that were created in the last 6, 12, or 24 months. Presumably, this comes from Facebook activity — the users who set up new business pages.
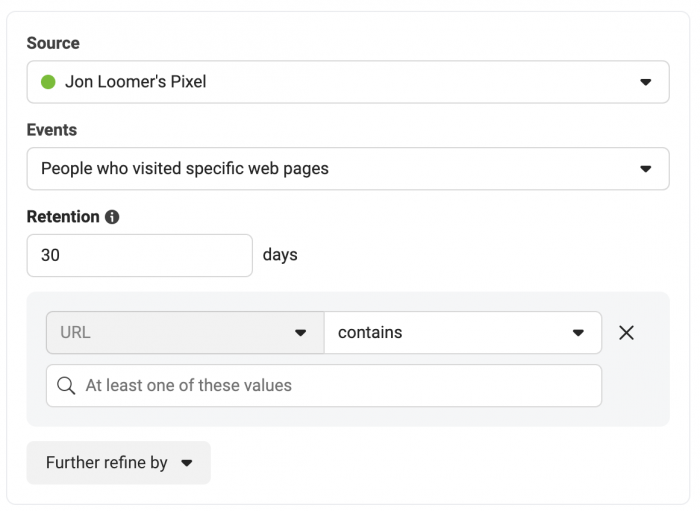
How to Access Them

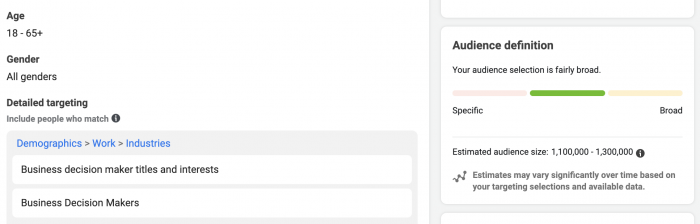
You can find these new B2B targeting options when building your ad set within the Detailed Targeting section. First, the three segments based on job titles for decision-makers…

Business Decision-Maker B2B Targeting

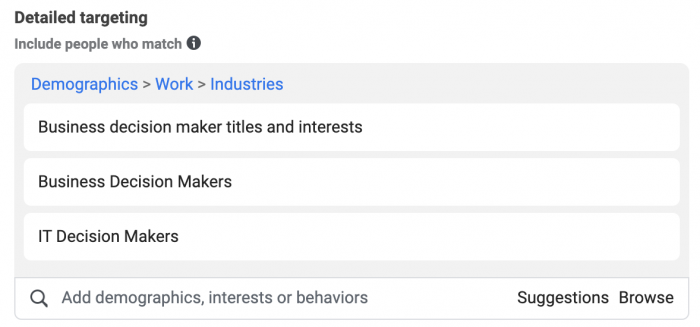
These all fall under Demographics > Work > Industries.

The New Active Business segments are also added within Detailed Targeting.

New Active Business B2B Targeting

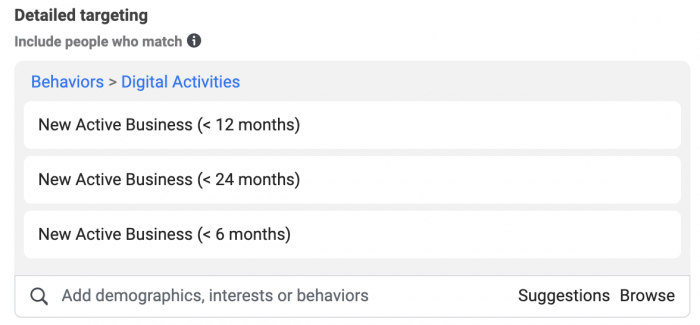
These all fall under Behaviors > Digital Activities.

Audience Sizes and Overlap

These are worldwide audiences, so keep in mind that they will shrink depending upon the countries that you’re targeting.

The populations for the decision-maker segments are as follows:

  • IT decision-makers: 815k – 958k
  • Business decision-makers: 1.2M – 1.4M
  • Business decision-maker titles and interests: 1.2M – 1.4M

Do you see what I see? The “Business decision-makers” and “Business decision-maker titles and interests” segments appear to be the same size. But do they overlap entirely?

It sure seems that way! The Estimated Audience Size when using these two audiences is 1.1M – 1.3M people.

Business Decision-Maker B2B Targeting

That’s… weird. It would seem that there’s no reason to have both of these audiences since the Venn diagram is close to a complete circle.

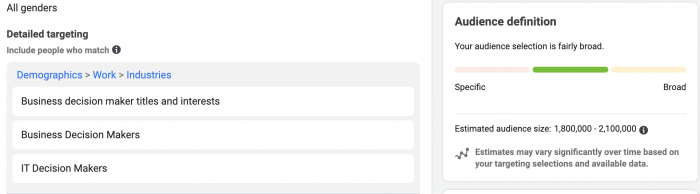
Since the audience increases to a range of 1.8M to 2.1M when including IT business-makers, we can presume that this audience consists primarily of people who aren’t in the other two.

Business Decision Makers B2B Targeting

The populations for admins of new businesses are broken down as follows:

  • < 6 Months: 9.6M - 11.3M
  • < 12 Months: 14.9M - 17.6M
  • < 24 Months: 24.8M - 29.2M

These are far larger groups than the segments for decision-makers.

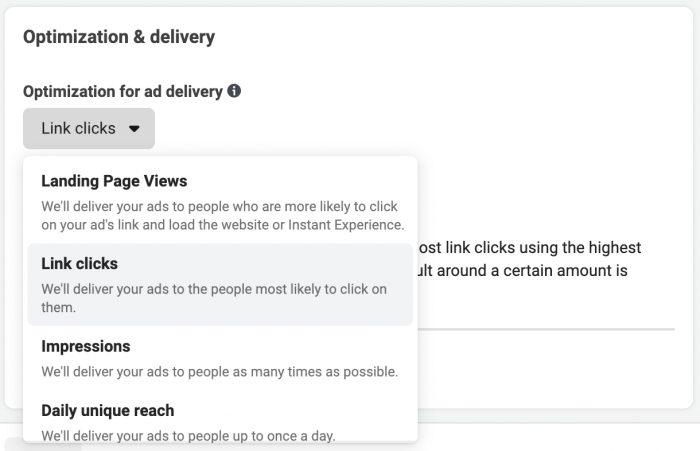
How Might You Use Them?

Great, great. So, now what? Well, I have a few thoughts.

First, it would seem that the segments based on decision-maker groups may be the most useful. Assuming Facebook is using methods to accurately segment these people, you can go after high-level business people who are the ones with the credit card. However, this is also the smallest audience — particularly once you filter by country. That could impact your success.

After that, it’s going to depend upon your product or service. If you have a product that specifically solves problems for people in IT, the IT decision-maker segment is the most specialized of these options.

The business decision-maker segments are a bit broader and don’t seem to be isolated to closely-related industries. So, at that point, your solution needs to help businesses generally, regardless of the industry, to be useful.

Of course, this also depends upon how much you trust Facebook learning and isolating the ideal audience — within the broader audience — for you. In other words, don’t let the broadness of the audience scare you away from experimenting.

It’s unclear exactly how the segments for admins of new businesses is built, and these are obviously much larger audiences. My inclination is that you could focus on those who have recently started a business and the needs that they have.

Will these options work for you? Experiment to find out!

Your Turn

Have you tried out any of these B2B targeting options for your Facebook ads? What do you think?

Let me know in the comments below!

The post New B2B Targeting Options for Facebook Ads appeared first on Jon Loomer Digital.

Advantage+ Creative was previously Dynamic Experiences and changed its name with the rollout of Meta Advantage in March. But, how these optimizations work evolved considerably since then.

Meta Advantage+ Creative

Let’s discuss how Advantage+ Creative works now and whether you should turn it on with your Facebook ads.

What is Advantage+ Creative?

Advantage+ Creative allows for some minor (automatic) enhancements of your ad. Several variations of your ad will be generated that users will see based on which version will most likely lead to a response.

Potential enhancements include…

Media Enhancements

  • Adjusting image brightness and contrast
  • Applying artistic filters
  • Varying aspect ratio
  • Adding templates to a feed image

Ad-Level Compositional Changes

  • Adding labels
  • Displaying relevant Facebook comments
  • Swapping combinations of text, headline, and description

It’s important to understand that this isn’t simply Facebook taking an ad image and automatically adjusting the brightness and contrast for the ad. Each of these adjustments is personalized. Some adjustments will apply to some people while others will apply to others — depending on what people are most likely to respond to.

Requirements

If you’d like to turn on Advantage+ Creative, you must use the following settings:

  • Traffic or Conversions objective
  • Single image or video
  • Ad with a website destination
  • One ad per ad set

The one ad per ad set limitation might be easy to miss, but it makes sense — particularly for lower budgets. This will automatically generate multiple variations, so you don’t necessarily need to create a bunch of different ads.

The Advantage+ Setup Process

Assuming you’re using the Traffic, Conversions, or Sales objectives (depending on whether you have ODAX), create a new ad using a single image or video. Add primary text, headline, and description (using multiple text options if you can).

Then, upload a single image or video. Let’s use an image since that (at least for me) leads to more enhancement options.

After you advance through the “Crop” screen, you’ll advance to “Optimize.” It looks like this…

Meta Advantage+ Creative

If you’d like, you can immediately accept all three optimization recommendations.

Meta Advantage+ Creative

Instead, let’s go step by step so that you can see what’s possible.

Meta Advantage+ Creative

Let’s start with Standard Enhancements. When turned on, Facebook will apply some minor creative enhancements like aspect ratio, applying a template to your image, or displaying labels.

Meta Advantage+ Creative

The second enhancement is image brightness and contrast, which is self-explanatory.

Meta Advantage+ Creative

And finally, you can automatically enable music when using the Instagram Reels placement. You only uploaded an image? Well, Facebook can either automatically select music for you or you can manually select a track.

Meta Advantage+ Creative

Example

I’ve yet to find a way to preview exactly what your changes will look like when you turn this on. But Facebook does provide the following generic example…

Meta Advantage+ Creative

Most of these adjustments are tough to spot at first.

The image has been cropped differently in one placement. In another, the image seems brighter. And in another, the headline and text have been swapped. The final image shocases labels.

Viewing Results

Unfortunately, it doesn’t look like you’ll be able to get any clear indication of what’s working and what’s not working with these enhancements. From Facebook:

When you use standard enhancements, you will be able to see aggregate performance metrics of all the delivered variations in Ads Manager, but there will not be a breakdown by format or ad creative variation. We recommend using split testing to see how standard enhancements perform overall compared to standard ads.

Should You Trust These Adjustments?

I admit that I’ve mostly been very slow to blindly trust some of these automatic adjustments. But, now that Advantage+ Creative goes through the steps like this, the adjustments all look so minor that I don’t think there’s anything to be scared of.

Why not try it out?

The post Advantage+ Creative: Automatically Optimize Facebook Ads appeared first on Jon Loomer Digital.

Did you miss our previous article…
https://www.sydneysocialmediaservices.com/?p=1895

The challenges related to tracking, targeting, and optimization have increased during the past couple of years. And yet, Meta has a solution that is sitting right in front of them. Meta needs to leverage Outbound Clicks.

This isn’t a particularly complex concept. Even the simplest application could be a huge help for advertisers looking to send traffic to their stuff — whether it’s on a website they own or a third-party website.

In this post, we’ll cover the obstacles these advertisers currently face, what Outbound Clicks are, and how they could be leveraged for the advertiser’s benefit.

The Problem

There are a couple of groups of advertisers who could benefit from an expansion of Outbound Clicks.

1. Advertisers who sell on a third-party website. This is one of the most frustrating places to be. If you can’t use your pixel, you aren’t able to track results, optimize for a conversion, or target those who clicked on your ad.

2. Advertisers who are heavily impacted by iOS 14+. If a large percentage of your audience consumes your content while on an iOS device, tracking opt-outs could significantly impact your reporting, optimization, and retargeting.

Outbound Clicks aren’t going to solve all of these advertisers’ problems, but they can absolutely help — assuming Meta leverages them properly.

Outbound Clicks

Before we get to how Meta could leverage Outbound Clicks, it’s important that we explain what they are — and how they’re different from other metrics. Let’s define the various “Click” metrics that are often confused.

Clicks (All): This includes ALL clicks on your ad (like it says). So, link clicks, clicks to your page profile, post reactions, comments, shares, clicks to expand media to full screen, clicks to take action (liking your page or RSVP for an event), and more. Everything.

This also applies to CPC (All) and CTR (All). If you’re following these metrics, you’re looking at total engagement on your ad, and not just clicks on a link to the thing you’re promoting.

Link Clicks: This is the number of clicks on links within the ad that lead to advertiser-specified destinations, on or off Meta technologies. While links away from Facebook are included in these clicks, it can also include clicks to open other experiences within the ad, like click-to-call, click-to-message, lead forms, playable experiences, and more.

This also applies to CPC (Cost Per Link Click) and CTR (Link Click-Through Rate).

Outbound Clicks: The number of clicks that take people away from the Meta family of apps. This includes clicks on links in the displayed ad as well as links to external websites and apps within Instant Experiences, lead forms, and collections.

Landing Page Views: The number of times someone clicked on your ad link and successfully loaded a page of your website with the Meta pixel. This is an Outbound Click, but to a website with your pixel that successfully loads.

Of course, the most valuable of these click metrics for advertisers would be the Landing Page View. We know that someone clicked on our ad, was redirected to our website, and the website loaded. But, of course, this may not be an option if you are sending someone to a website where your pixel doesn’t exist (like Amazon).

Remarketing Solution

As discussed earlier, one of the most annoying challenges for an Amazon seller, for example, is that they can’t target those who clicked their ad and went to Amazon. Their pixel isn’t on Amazon, so a Website Custom Audience wouldn’t be possible.

Let’s say that you have an initial prospecting ad that promotes your product, sending them to Amazon. How do you remarket to those who initially engaged with that ad? Right now, your options are limited. If you used a video, you could target those who watched that video. You could also target a Page Engagement custom audience, which allows you to reach anyone who has clicked on any post or ad. That’s not ideal either.

But, what about a custom audience based on Outbound Clicks? It wouldn’t matter whether your pixel exists on the external website. You could target anyone who clicked on your ads to an external website.

The Page Engagement custom audience was too broad. This limits those clicks to outbound clicks.

Of course, it would be nice to add even further granularity. What if, when creating these audiences, you could select the ads or URLs that you used for these posts or ads? Then you could create audiences based on the specific website pages people went to after clicking your ad.

It would work a lot like the current website custom audience based on URL…

Website custom audience by URL

This could also, potentially, help advertisers who have a high concentration of iOS users who have opted out of tracking. Meta is super unclear about how opt-outs impact targeting (only that these audiences will be smaller), but I assume this to mean that a user who opts out of tracking will no longer be included in website custom audiences.

But, of course, opt-outs do not apply to activity on the Facebook platform. So, an Outbound Click could conceivably be used as the source for a targeting audience.

Optimization Solution

If you’re selling a product on Amazon, you can’t optimize for a conversion because your pixel doesn’t exist there. You also can’t optimize for Landing Page Views for the same reason. Your primary option, if traffic is your goal, is Link Clicks.

Link Click Optimization

What if you could also optimize for Outbound Clicks? This would assure that Meta’s ad systems are looking specifically for people who will click out to an external website or app.

Now, the difference between Link Clicks and Outbound Clicks (discussed above) is subtle, but wouldn’t it make sense to offer an option to optimize for Outbound Clicks? Especially if your ad includes other experiences that could be counted as a Link Click but not an Outbound Click, it would certainly help the advertiser get the specific actions they want.

Your Turn

Do you think Outbound Clicks could be used to fill some holes for advertisers? What other solutions would you add?

Let me know in the comments below!

The post How Meta Could Leverage Outbound Clicks appeared first on Jon Loomer Digital.

If you ever feel like your Facebook ad results are too good to be true, they probably are. In the case of ThruPlay numbers, it’s likely due to the Audience Network Rewarded Video placement.

I’m glad I caught this quickly, but I guarantee that many other advertisers are wasting thousands and thousands of dollars, assuming they found some magic bullet that is giving them amazing results. Unfortunately, they likely won’t be too happy when and if they find out what is actually happening.

Let’s go through this from the beginning. In this post we’ll cover the following:

  • What is ThruPlay?
  • My campaign
  • My results from ThruPlay
  • What is Audience Network Rewarded Video?
  • How to check placement distribution
  • Why this was caused by Facebook Optimization
  • What to Do?

Let’s go…

What is ThruPlay?

ThruPlay is a metric used for measuring Facebook video engagement. A “ThruPlay” is reported whenever your video is played to completion — or for at least 15 seconds.

That final part (“or for at least 15 seconds”) is what makes this metric so misleading. “Thru” suggests someone watched the whole thing. Well, that’s the case if the video is only 15 seconds long or shorter. But if it’s 30 seconds or two minutes or 10 minutes — nope. It just measures the number of people who watched for at least 15 seconds.

Anyway, that the metric is misleading isn’t really the focus of this post. This metric is used for both reporting and optimization purposes.

My Campaign

I don’t want to get too lost in the weeds here, but I think it’s necessary to explain what I was trying to do. I used a 20-second video to promote a podcast episode. I used both a CTA button (“Listen Now”) and a link in the text to drive people to the episode on Spotify.

This is a new podcast and it’s a non-business project, so I wasn’t looking to spend much at all. Just trying to get it off the ground.

Since I was sending people to Spotify, measurement and optimization were a bit tricky. I don’t own the destination website, so I won’t know how many people play the episode or subscribe to my show. My primary measure for success in Ads Manager will be Unique Outbound Clicks since that’s the only way I can measure direct clicks on my ad away from Facebook.

I’ve never been a huge fan of Link Clicks optimization since quality can be low, so I created three different ad sets optimized in three different ways:

  • Link Clicks
  • Post Engagement
  • ThruPlays

The ThruPlays optimization, of course, is what inspired this blog post.

My Results from ThruPlay

Keep in mind that my budget was extremely modest on this campaign, so I wasn’t expecting much. But I quickly noticed something weird with the ad set that was optimized for ThruPlay. The results were… practically impossible.

Reach ThruPlay

This is crazy. Nearly every view was a ThruPlay. The average watch time was 20 seconds (the entire thing). The total number of ThruPlays is higher (126%) of the total number of people reached. Frequency was just 1.31, so how in the world was this possible?

This math essentially means that nearly every person who was reached with my ad watched the entire video. I realize I make a damn good video (I really don’t), but this doesn’t seem realistically possible.

One more element: Of the 600 or so people who watched the entire video, only ONE resulted in an outbound click. So, my video was so engaging that people wanted to watch the entire thing. But, the entire point of the video was to get them to click and listen to my podcast episode. And yet, only ONE person did that?

This really didn’t make sense. It made me ask a lot of questions. I shared it with my Power Hitters Club – Elite community, and one very alert member suggested I look into the Audience Network Rewarded Video placement.

Audience Network Rewarded Video

Audience Network is how app developers monetize their apps with Facebook ads. They place ads inside their apps so that advertisers can target users with Facebook ads but away from the Meta family of apps.

Here’s the best way to explain Audience Network since it all made sense to me once I was exposed to my own ad the first time on Trivia Crack years ago. You’re playing a third party app that is probably free. It’s not a Facebook app. But your ads may appear there. That’s how those apps make money.

I actually remember seeing my ad on Trivia Crack. In fact, I clicked it accidentally — which is one of my biggest complaints about the placement.

But that was related to link clicks and landing page views. There is also a Rewarded Video placement. This is how Facebook defines it:

Rewarded video ads are a fullscreen experience where users opt-in to view a video ad in exchange for something of value, such as virtual currency, in-app items, exclusive content, and more.

Do you see how this placement is problematic? People are forced to watch these videos — not just a little bit, but the entire video — in exchange for something of value in the app. The user has no interest in the thing you are promoting in the video. They are only watching (loosely) to get something for it.

How to Check Distribution by Placement

Hopefully you’re aware of the Breakdown feature because it’s an immensely valuable tool. This is how you can breakdown you results by placement.

Click the “Breakdown” dropdown on the right in Ads Manager. Then select “By Delivery” and then “Placement.”

Breakdown by Placement

And there it is. The vast majority of my ad spend was used for the Audience Network Rewarded Video placement.

Audience Network Rewarded Video

This would explain why the ThruPlay percentage was so high. These people were forced to watch the entire video. It also explains why there was only a single outbound click. These people are deeply engaged with an app (probably a game). They’re only watching the video to get something they can use for the app. Why would they click out of that experience?

They wouldn’t. And they didn’t.

How This Was Caused by Facebook Optimization

Of course, this is absolutely not what I wanted. I wanted people to watch my entire video — but only because the assumption was that if someone watched the entire video they’d be more likely to click to listen to my podcast. But that’s not going to happen in this case because it’s not normal.

This is one of the many problems with Facebook ads optimization. If you optimize for something, all Facebook cares about it getting you as many of those things as possible for the lowest cost. While that might be great for purchases, it’s often going to create issues for other actions.

I only want people to watch my entire video because I assume that these are normal people. And if they were normal people, watching an entire video would make them more likely to click to listen to my podcast. But that wasn’t happening. Why? Because this is the lowest quality possible of a ThruPlay.

The same thing happens if you optimize for Link Clicks or Landing Page Views or Post Engagement or just about anything else. Facebook does not care about whether the actions they get for you are quality actions. They only care that they get you as many as possible.

The problem, though, is that there are many ways to get these low-quality actions and Facebook’s systems will go straight to them if you tell them that’s what you want. This is one of many very specific examples of how it can be manipulated.

What to Do?

If you ever have this issue and you want to prevent your ads from being shown on the Audience Network Rewarded Video placement, you can.

Within the ad set, make sure to select Manual Placements.

Facebook Ads Manual Placements

If you want, you can just turn off Audience Network entirely under Platforms.

Audience Network Platform

You can also choose to uncheck the Rewarded Video placement specifically if you want to keep the other Audience Network placements running.

Audience Network Rewarded Video

Your Turn

So, I encourage you — if you get results that are too good to be true, don’t assume that you’re just an advertising god. Do a little digging. Think about why these results might be possible. Often, it’s a weakness in the way Facebook optimizes.

Have you seen these issues with Audience Network Rewarded Video and other placements?

Let me know in the comments below!

The post Audience Network Rewarded Video Placement and Inflated ThruPlay Numbers appeared first on Jon Loomer Digital.

Did you miss our previous article…
https://www.sydneysocialmediaservices.com/?p=1801

To help advertisers keep aware of important updates from Meta, we’ve built a Quarterly Earnings Navigator Tool, available by clicking here. Since publishing our initial overview of the tool, Meta has released a new quarterly earnings report for Q2 of 2022. This article will cover some of the key highlights from the latest release.

Quick Highlight for Advertisers

Meta’s earnings release has a quick mention of ad prices:

In the second quarter of 2022, ad impressions delivered across our Family of Apps increased by 15% year-over-year and the average price per ad decreased by 14% year-over-year.

Advertisers worrying about consistently rising CPMs appear to potentially have some limited relief — at least at the overall level. However, it may be helpful to have some additional context.

Within our Earnings Navigator Tool, we can compare this difference in cost with historical periods:

Meta Average Price per Ad - % Change Year-over-Year. Shows Q4 2021 over 5% increase, Q1, 2022 down more than 7.5%, and Q2, 2022 down 14%.

Apart from this notable item, the release is filled with a variety of key data points. We’ll call out some headlines here below…

Meta Family of Apps – Daily Active People

Daily Active people grew – increasing 10 million vs the prior quarter to 2.88 billion

Bar graph showing daily active people, starting at just over 2 billion in Q4 2018, through 2.88 billion in Q2 2022

Meta Family of Apps – Monthly Active People

Monthly Active people also grew – increasing 10 million vs the prior quarter to 3.65 billion.

Bar graph showing Monthly Active People, starting at 2.64 billion in Q4 2018, to 3.65 billion in Q2 2022

Facebook – Daily Active Users

Daily Active Users of the Facebook platform grew 8 million to 1.968 billion.

Bar chart showing Facebook Daily Active Users, starting at 1.128 billion in Q2 2016 to 1.968 billion in Q2 2022

Facebook – Monthly Active Users

Monthly active users of the Facebook platform declined 2 million to 2.934 billion.

Bar graph showing Facebook Monthly Active Users, starting at 1.7 billion in Q2 2016 to 2.9 billion in Q2 2022.

You can also check out the Quarterly Earnings Navigator to see a regional breakout of Facebook Daily and Monthly Active Users with more detail.

Meta Headcount

Meta Headcount grew 5,748 to 83,553 – an increase of ~7.4% in overall headcount.

Bar graph showing Meta Headcount, starting at 18,770 in Q1 2017 to 83,553 in Q2, 2022.

Other Data Points

For additional info such as App Revenue, App Operating Income, Revenue per User, and some other calculations based on provided info in Meta’s Earnings Release, be sure to check out the various tabs across the Earnings Navigator Tool.

Your Turn

What did you find particularly interesting from the earnings report? Does the Earnings Navigator Tool help you identify anything surprising?

The post Meta Quarterly Earnings Q2 2022: Topline Observations appeared first on Jon Loomer Digital.

Did you miss our previous article…
https://www.sydneysocialmediaservices.com/?p=1764

Meta announced several new features to improve Lead Ads back in May. One of those features is Lead Filtering, which can improve the quality of your leads.

Not everyone has the feature yet, but I do. So, let’s walk through what Lead Filtering is and how you might use it.

What is Lead Filtering?

One of the biggest issues advertisers have with Meta Lead Ads is the quality of leads. It’s incredibly easy to complete a lead form, which can be great for volume but not so great for quality.

Lead Filtering allows you to ask a qualifying multiple-choice question at the top of your lead form. If a favorable answer is provided, the user will be able to complete the form. Otherwise, the user will not be able to submit it.

This is particularly useful for leads that go to a sales team. If you find that your team is wasting time attempting to contact potential leads that aren’t your target customer, Lead Filtering can help.

How to Set Up a Lead Filtering Question

First, you’ll need to collect leads using Instant Forms (selected within the ad set).

Meta Lead Ads Instant Form

At the ad level, click to create a new form.

Meta Lead Ads Instant Form

Complete the Form Type and Intro sections as you normally would. Then expand the Questions section. You might see a message about saving time on follow-ups (this is Lead Filtering).

Meta Lead Ads Lead Filtering

Add a multiple-choice question.

Meta Lead Ads Lead Filtering

On the right, you’ll see a toggle for Lead Filtering. Toggle that on.

Meta Lead Ads Lead Filtering

Now, enter a custom question with at least two potential answers.

Meta Lead Ads Lead Filtering

There’s a column for “Lead Filter” so that you can designate an answer as “Lead” or “Not a Lead.”

Meta Lead Ads Lead Filtering

Completion Screens

You will now see separate sections within your form for “Message for Leads” and “Message for Non-Leads.”

Meta Lead Ads Lead Filtering

Here’s an example of a message for leads…

Meta Lead Ads Lead Filtering

And here’s an example of a message for non-leads…

Meta Lead Ads Lead Filtering

How it Looks

The lead form itself will look something like this…

Meta Lead Ads Lead Filtering

Notice that this qualifying question is asked before a user can submit their contact information. If I select “Within the next three months,” I am taken to the questions to collect my contact info. If I select “Beyond the next three months,” I’m taken to this screen…

Meta Lead Ads Lead Filtering

I am not able to complete the form. If I clicked this answer by mistake, of course, I can go back and change my answer.

Your Turn

Is Lead Filtering a feature that you find useful? How might you apply it?

Let me know in the comments below!

The post How Lead Filtering Can Improve the Quality of Meta Lead Ads appeared first on Jon Loomer Digital.

I’ve gotta tell you, I’m really kinda fed up with the misuse and overuse of the “Don’t build your house on rented land!” rallying cry. Every time a platform changes or a feature gets taken away or Facebook goes down for eight hours, “gurus” flock to Twitter and LinkedIn and Facebook to shout: “SEE! This is why you don’t build your house on rented land!”

And it seems that absolutely everyone eats it up. “YES! You’re so right!” How do you argue with that, right? And they share and everyone else eats it up, too. It just keeps going and going…

All the while, using that rallying cry for that moment didn’t make any sense. But this is a phrase that strikes a chord for whatever reason, and people just can’t resist the attraction. It’s like marketing moths to a flame.

Let me explain…

A Thread of Truth

The “rented land” phrase is all about not relying entirely on a platform that you don’t own. You don’t own Facebook or Twitter or LinkedIn or YouTube, so you shouldn’t “build” your business there.

Sure, there’s some thread of truth to this. The idea is that it’s so much more important to own something — that “something” being your website or email list, in particular. While this is certainly true, the phrase is overused to apply to situations that don’t make any sense.

Facebook is shutting down Facebook Podcasts? THIS IS WHY YOU DON’T BUILD YOUR HOUSE ON RENTED LAND! This absolutely happened, by the way. And it makes no sense because no podcaster relied entirely on Facebook.

Facebook goes down for eight hours? THIS IS WHY YOU DON’T BUILD YOUR HOUSE ON RENTED LAND! You know, because your own website would never go down for eight hours (mine certainly has).

All the while, of course, screaming these statements from Facebook or Twitter or LinkedIn — you know, from rented land! These people are building their expertise and audiences from platforms they don’t own.

The Reality

The reality is this: Having something you “own” certainly gives you more control and is more reliable. But, you need to leverage rented land to get people there.

And actually, do you know what leveraging rented land is? It’s the definition of “marketing.” You rent space where your potential audience may be with the hope of sending them to the thing that you own.

But ultimately, how much do we actually own? You own your domain. You own your content. But again, it’s about control and reliability. You rely on so many things that you don’t own to make that website work. You rely on plugins and features that are hosted elsewhere to function properly.

When Meta pulled the plug on Facebook Podcasts, I actually read a comment that said you should just host the podcast on your own website. Come on! Should you be able to find and even consume your podcast on your website? Sure! (I do this.)

But, how in the world do you expect to build your audience? No one wants to hang out on your website! They want to hang out on the rented land. That’s why we send our podcast episodes to Apple Podcasts and Spotify and Google Podcasts and Amazon Music and everywhere else. We don’t own any of these.

Ownership, Control, and Adaptability

I wouldn’t advise that you build a business entirely within a platform that you don’t own, with no rights to the customer list. That is the one, very narrow, use of the “rented land” phrase that I’ll allow (because I’m the gatekeeper, dammit!).

But, here’s a point that we all need to understand: While “ownership” may mean more control and reliability, this is really about adaptability. If Facebook shuts something down, what are you going to do next?

Hell, just because you “own” your website, it doesn’t mean it’s not at risk. What if the entire way that we consume the internet changes and your website becomes obsolete?

The same with your email list. The rules on emailing customers and subscribers are constantly changing. What if, suddenly, your email list has no value?

In the end, it matters less and less about whether you own or rent everything. What’s most important is that you’re able to adapt to whatever disruption occurs.

Your Turn

What are your thoughts?

Let me know in the comments below!

The post A Rant About Building Your House on Rented Land appeared first on Jon Loomer Digital.

Did you miss our previous article…
https://www.sydneysocialmediaservices.com/?p=412

One of the issues advertisers struggle with most is controlling the frequency of ads shown. At some point, you’re just wasting money showing the same ads to the same people.

There is no ideal frequency that is best for every advertiser in every situation. Some frequency is good. But advertisers have very few options to control it. There’s just not a whole lot that you can do beyond adding creatives or changing targeting.

Meta needs something. Let’s discuss…

Reach Optimization

One of the nice benefits of using Reach optimization is that you get access to Frequency Capping.

Facebook Frequency Cap

With frequency capping, you can tell Meta to limit impressions to once every seven days, for example (which is the default). But you can customize that however you want. It’s great!

Reach and Frequency Buying Type

Frequency capping is also available when using the Reach and Frequency buying type.

Reach and Frequency

Of course, you may not even know that this option exists — and it doesn’t for all advertisers. Truthfully, it’s not a great option for many because it has such a high minimum threshold for budget that it will price most advertisers out.

But, sure, you can turn frequency capping on there, too.

Reach and Frequency Control

Other Objectives Besides Reach

Unfortunately, the only time you can use frequency capping under the Auction buying type is when optimizing for Reach. Reach has its limitations since you can’t optimize for a specific action, like a conversion. The entire point of Reach optimization is showing your ad to as many people as possible.

Wouldn’t it be great if you could control frequency for other optimization options, too?

Now, I understand that there has to be a pretty good reason for why frequency capping isn’t available for other optimization options. I’m sure that this would impact the algorithm and the optimal way that Meta wants to deliver your ads.

But… I don’t know. You can make the argument that you interrupt the algorithm in similar ways when using cost controls like cost caps and bid caps.

So, why not make frequency capping available for other optimization options? Even a simplified version would be great. Something that would allow us to say, “Let’s show this ad, but try not to show it 50 times to this person in a week.”

This may be an exaggeration, of course, but adding an actual lever to this to give us some sort of control over frequency would be ideal. It may allow ads to remain relevant for a longer period of time, too.

Your Turn

How do you think frequency capping might work with other optimization options?

Let me know in the comments below!

The post Meta Needs Frequency Capping for More Optimization Options appeared first on Jon Loomer Digital.

Did you miss our previous article…
https://www.sydneysocialmediaservices.com/?p=400

A/B split tests are helpful for uncovering the most effective posts or ads in a scientific way. Did you know that you can do this with organic content?

You’re probably familiar with A/B split tests for Facebook ads. This process allows you to test variables like targeting, optimization, and creative in a scientific way, showing variations to random groups without overlap.

What’s great is a similar process is available for organic posts that you publish to your page. Actually, there are two different available ways to do this, one through Meta Business Suite and one through Creator Studio.

It’s entirely possible that this isn’t fully rolled out yet. In fact, I’ve seen some bugs in one version, and it also seems that what you see may be different from person to person.

With all of that said, I want to walk through the two ways that I can create A/B split tests of organic content…

Meta Business Suite

From the “Posts & Stories” section of Meta Business Suite, create a post.

A/B Test

Click the “A/B Test” icon to start a test. It will look like this…

A/B Test

You can include up to four versions of a post. All you do is create each version by providing the copy and either an image or video. For links, either provide the URL in the copy or paste it into the link preview section.

When you’re done, you can preview all versions of your post before publishing…

A/B Test

You can even schedule the post if you’d like.

A/B Test

The test will run for 30 minutes. A different segment of your page followers will see each version. Once the test is complete, the winning version will be published to your Facebook page. The other version(s) may still exist in news feeds as people engage, comment, and share.

Creator Studio

The approach using Meta Business Suite is extremely simple. But, maybe you want to add a little bit of complexity? You can do that with Creator Studio.

For whatever reason, some people have easy access to Creator Studio while others don’t. From my page and Business Suite, I no longer get links to the tool.

You should be able to access Creator Studio by clicking this link.

From there, go to Post Testing under “Tools.”

A/B Test

Click “Start a Test” and it will look like this…

A/B Test

This is a lot different from the Business Suite version, right?

The first step will be to select a Content Type.

A/B Test

Just know that video posts can only be compared against other video posts. You can mix and match between image, link, and text posts.

If you do choose to test video posts, you’ll need to click the “Edit” button at the far right after uploading the file.

A/B Test

This will give you access to all of the various customizations that are unique to videos.

A/B Test

When you’re done, it will look something like this…

A/B Test

As you can see, you can publish or schedule the test. Once you click to schedule or publish, you’ll get some more settings…

A/B Test

This is one of the big differences between A/B tests from Meta Business Suite and Creator Studio (at least for me — see the upcoming section about bugs). You can select from various “key metrics.”

A/B Test

This way, you determine the metric Meta uses to determine the winner. Choose from Comments, Shares, Reactions, People Reached, and Link Clicks.

You can also customize how long you want the test to run.

A/B Test

Choose from 10 minutes, 30 minutes, 1 hour, 3 hours, and 24 hours. Once the test is complete, the winning post will be published to your page.

A Note on Bugs

It’s entirely possible there’s something I’m not seeing when creating a test from Meta Business Suite. When I choose to publish or schedule a test, I get the following…

A/B Test

That “moment” takes many moments. Actually, I’ve never found an end to it. Originally, I thought it just took a while to publish each individual version. Then I thought maybe it wouldn’t “complete” until the test was over. But I waited that out, and this message kept showing.

I’m not sure if another important screen is supposed to appear next. It’s possible that additional customizations that happen in Creator Studio are intended to appear here. No idea. I do know that the test still ran even though this page didn’t finish loading.

It still does appear that there are significant differences between Business Suite and Creator Studio A/B split tests. But, I can’t say with 100% certainty that all differences that I’m seeing are intentional.

Viewing Results

Once again, I believe there’s a situation of what I see and what others see as being different.

If I create an A/B test in Meta Business Suite, there is nothing (in that section, at least) that shows me the test results. I can view the individual post versions and metrics associated with them, but that’s not unique. It’s the same as any other post.

Creator Studio, though, shows clear test results. These are found within the same Post Testing section under Tools.

A/B Test

And guess what? These results include all A/B tests of organic posts, including those that originated from Meta Business Suite.

Click through to see a side-by-side comparison.

A/B Test

First, I can’t ignore that the “Reached” stats are clearly wrong for any image post. There’s no way that a post that reached one person has seven reactions.

Second, this is part of the potential problem of these short tests. This shows the results for a very short period of time when the test ran. Is that enough time to choose a winner? It’s one reason to consider going with the 3-hour or 24-hour options in Creator Studio.

You can also choose to track the results of each variant after the test is complete. Of course, the winning post will see the biggest benefit of viewing results this way.

A/B Test

If you don’t like the post that Facebook chose, you can override the selection and publish a different one to your page. That is done at the top.

A/B Test

Is This Useful?

I have to admit that I avoided experimenting with A/B split tests of organic posts for quite some time. It sounded great in theory, but I was also negatively influenced by how A/B tests work for ads and assumed this would be pretty much the same.

A/B tests for ads take anywhere from a few days to four weeks. I have no patience for doing this with every organic post. There’s also a matter of the overall usefulness of A/B tests for ads since they are best suited for learning something over a few weeks that you can then apply in the future.

But, this is way different in the best ways. The test is super easy. The test will be completed in anywhere from 10 minutes to 24 hours. The winning post is published to your page.

Also, this is really the only way you can have Facebook optimize for an action when publishing an organic post. If your goal is link clicks, you can have Facebook choose the version that results in the most link clicks. That’s great!

I’ve only started using this feature so far, but early returns are solid. I’ve run two tests, and one resulted in a winning post that has reached over 17,000 people with close to 2,000 engagements.

Of course, don’t expect this to be miraculous either. If you submit four post versions that all stink, expect to get bad results. This at least allows you more opportunities to find something that hits — and also learn from what works and what doesn’t.

An Ads Tie-In

While this is for organic posts, A/B testing can absolutely benefit our advertising.

One of the negatives of A/B testing of ad creative is that you can spend a lot of money simply running a test to see which ad is most effective. But, you could move that effort to organic testing. Find the post that gets the most link clicks (or whatever you want), then put money behind that winning post.

It would seem that this could make some of the guessing, experimentation, and budget a bit more efficient, at least in theory.

Your Turn

Have you experimented with A/B tests of organic posts? What results are you seeing?

Let me know in the comments below!

The post 2 Ways to Create A/B Split Tests of Organic Content on Facebook appeared first on Jon Loomer Digital.

If you run Instant Experience ads, how do you measure success? Facebook has added metrics that may prove helpful.

In this post, I’ll help you find those metrics and understand what they all mean.

Let’s go…

Access the Metrics

You’ll need to add columns to your Ads Manager report.

Click the “Columns” dropdown in Ads Manager and select “Customize Columns.”

Facebook Ads Manager Customize Columns

Run a search for “Instant Experience.” You’ll see seven metrics…

Instant Experience Metrics

What the Metrics Mean

Following are the metrics related to Instant Experience measurement and what they mean…

Instant Experience View Time: “The average total time, in seconds, that people spent viewing an Instant Experience.” This is similar to video view time metrics for measuring an engaged user. (SIDE NOTE: I’d love to see this for Landing Page Views and traffic metrics.)

Instant Experience View Percentage: “The average percentage of the Instant Experience that people saw.” These ad units can scroll through multiple components. If your more important components are at the bottom, a higher percentage would be a priority.

Instant Experience Impressions: “The number of elements viewed in an Instant Experience.” This one confuses me a bit. While my assumption would be that an impression would be opening an Instant Experience, that metric is coming up. Instead, this seems to be related to the number of components that you see (similar to the percentage).

Instant Experience Reach: “The number of people who viewed elements from an Instant Experience at least once.”

Instant Experience Clicks to Open: “The number of clicks on your ad that open an Instant Experience.” (This metric is in development)

Instant Experience Clicks to Start: “The number of times an interactive component in an Instant Experience starts.” This will typically be a video. (This metric is in development)

Instant Experience Outbound Clicks: “The number of clicks on links in an Instant Experience that take people off Facebook-owned properties.” Instant Experiences are often used to warm up an audience before sending them to a product page on the advertiser’s website. (This metric is in development)

What About Audiences?

This may be bit off-topic, but I can’t ignore it.

I wrote about the need for more targeting options due to iOS 14+ changes in another blog post. That includes audiences related to Instant Experience engagement.

Right now, Instant Experience audiences only include the following:

  • People who opened your Instant Experience
  • People who clicked a link within your Instant Experience

That’s it!

Instant Experience Engagement Audiences

It’s not as if Instant Experience is some new format. It’s been around long enough for Facebook to develop this further. And there are so many options for audience building — based on these seven metrics alone — that could provide some great options for advertisers.

Facebook is clearly collecting and storing this information. Why not allow us to target based on it?

Your Turn

How do you measure the success of your Instant Experience ads?

Let me know in the comments below!

The post Success Metrics for Facebook Instant Experience Ads appeared first on Jon Loomer Digital.