Posts

Maybe your ads are running, but Meta doesn’t spend your entire budget. Or maybe your ads won’t deliver at all.

Why??

It’s a common issue. Let’s break down the potential explanations for what might be happening and how you can address it.

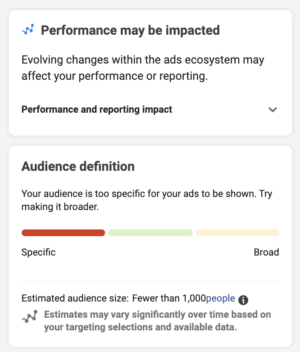
1. Your Audience is Too Small

This one’s rather logical, but some advertisers still miss it.

If your goal is to target a very small audience and set a budget that may be suitable for a larger audience, you shouldn’t expect your entire budget to spend.

You may see that your budget spends initially, but it may struggle with time — particularly if performance wanes.

If this is your issue, consider expanding your audience or lowering your daily budget.

2. Using Ad Set Spend Limits

Ad Set Spend Limits

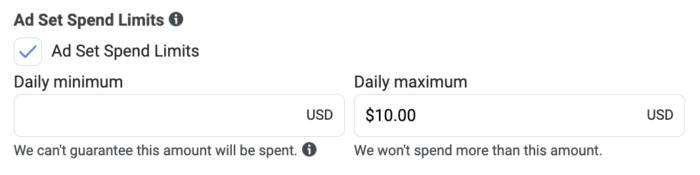
If you are using Advantage Campaign Budget (formerly known as Campaign Budget Optimization), you have the option of setting an ad set spend limit (or minimum). This may lead to delivery issues.

Any time you attempt to restrict the algorithm, your actions may impact delivery. If you’re going to use Advantage Campaign Budget, it’s recommended that you refrain from setting ad set spend limits, except in extreme situations.

3. Cost Per Result Goal or Bid Control

Cost Per Result Goal or Bid Cap

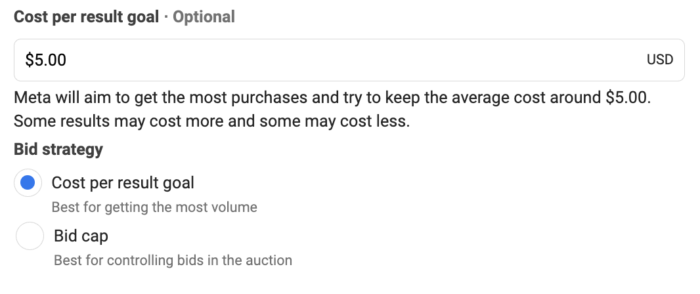
By default, Meta’s algorithm will attempt to get you the highest volume of optimized actions at the lowest cost. But you can choose to override that and enter a Cost Per Result Goal or Bid Control.

By doing so, you are restricting the Cost Per Result or bid based on your goals. The impulse might be to set an unrealistic Cost Per Result Goal or bid in an attempt to lowball the algorithm.

The result will almost never be magical results. Instead, expect to get under-delivery. If you’re going to use these options, be careful to set reasonable cost and bid controls.

Read here for more information on manual bidding.

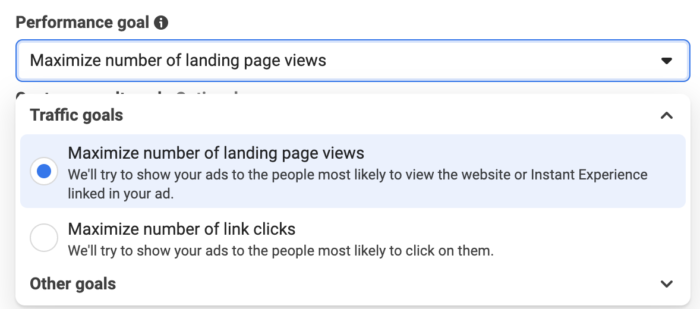
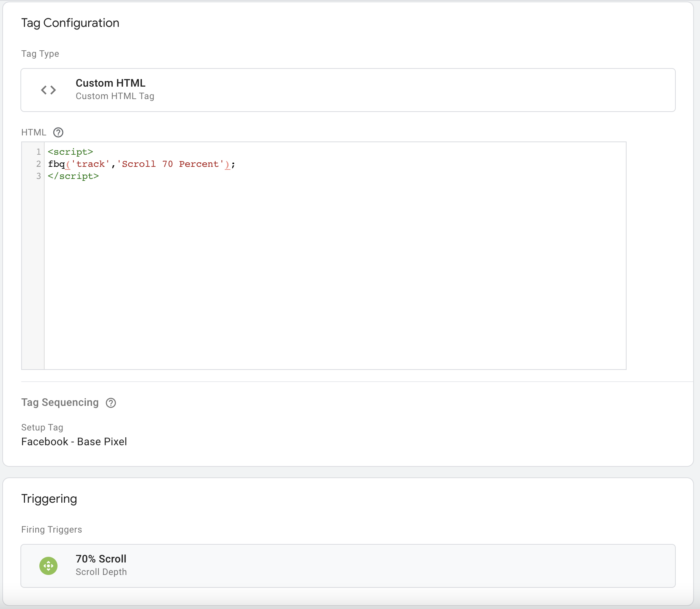
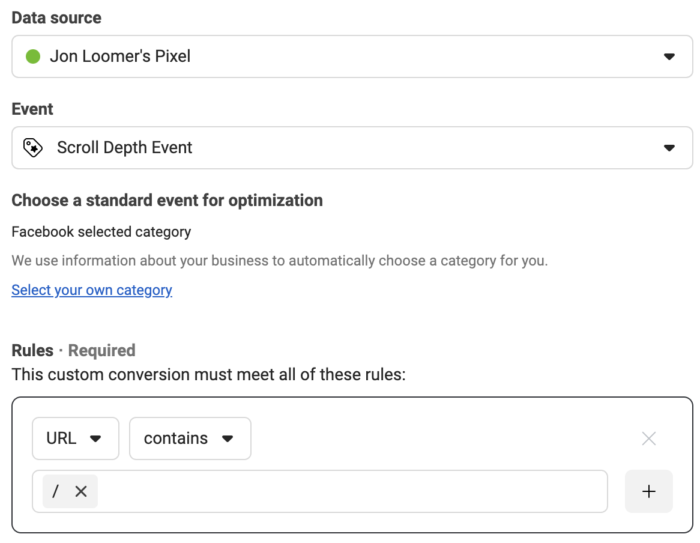
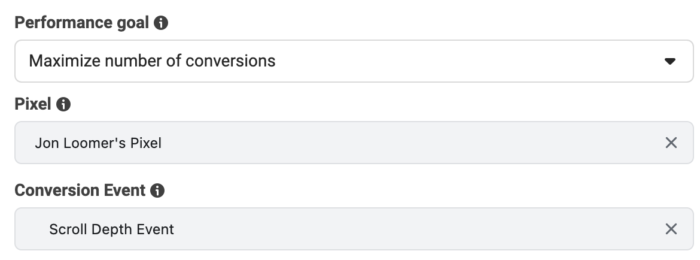
4. Optimization Event

Optimization Event

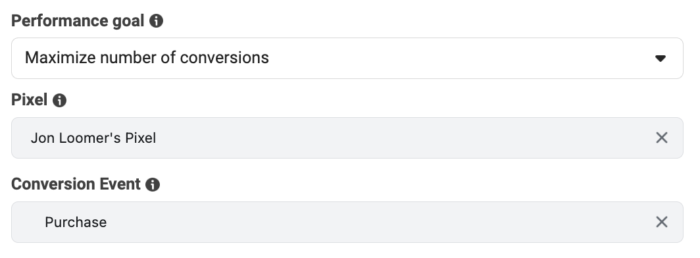
Your optimization event matters. Meta recommends setting a budget high enough to get at least 10 optimized actions per day (multiply the expected cost per optimized action by 10). Similarly, you may need to generate up to 50 optimized actions per week per ad set to exit the Learning Phase.

If you are unable to set a budget that is high enough to accomplish these goals, you may find yourself in Learning Limited. This often results in restricted delivery.

When this happens, consider switching to an optimization event that will result in more daily volume.

5. You Set up Dayparting

Meta Ads on a Schedule Dayparting

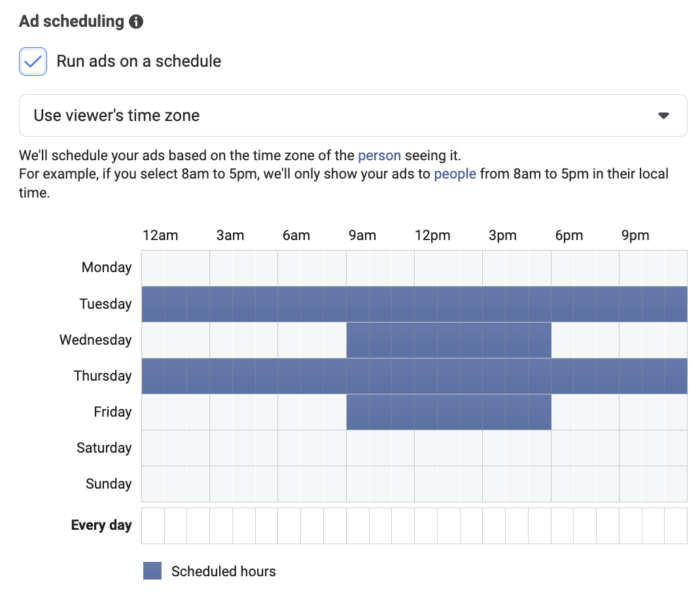
Some advertisers want their ads to only run on certain days or at certain times. If you use a lifetime budget, you can run ads on a schedule (also known as dayparting).

First, check to make sure that your ad set is supposed to run today. If you use dayparting, you may have chosen to turn it off.

Once again, restricting the algorithm can be problematic as well. Far too often, advertisers try to outsmart the algorithm. In the case of dayparting, they may choose to only run ads between 9am and 5pm during the week “because that’s when our customers are online.” Well, that’s also the most competitive time.

Your ads may struggle to deliver as a result.

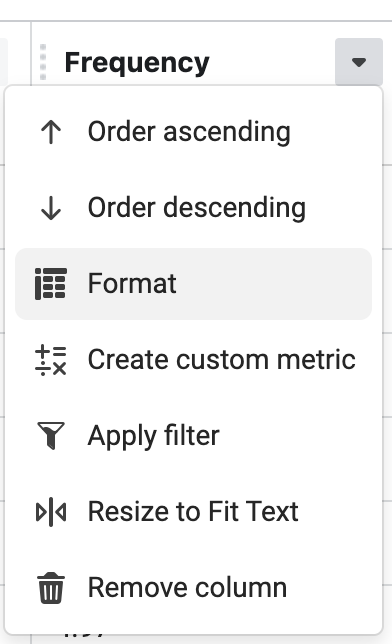
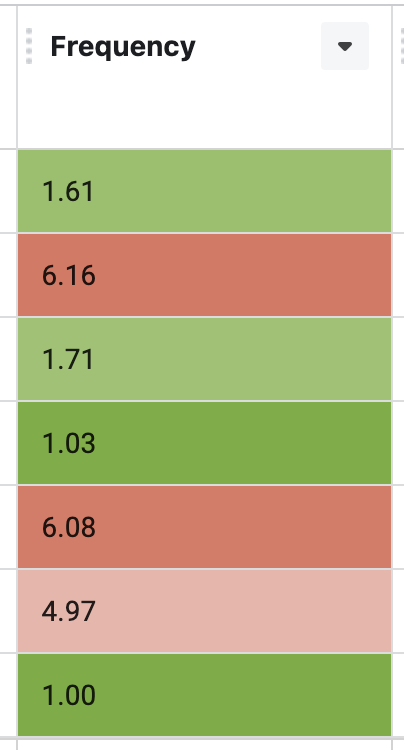
6. You Set a Frequency Cap

Frequency Cap

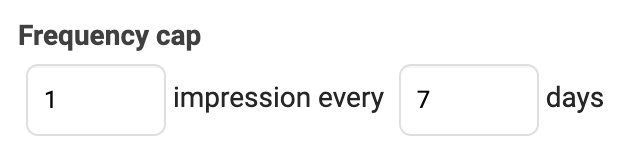
This is a limited situation when optimizing for Reach, but it happens. In this case, you can choose to set a frequency cap, which limits how often you reach your audience.

The default frequency cap is 1 impression every 7 days. If you use this, particularly for smaller audiences, you may notice that the ad delivers fine the first few days but then starts slowing down. Why? Because the algorithm has to wait 7 days to deliver your ads to the same audience again.

If you’re going to use Reach and this is an issue, consider adjusting the frequency cap.

7. You Use Automated Rules

Automated Rules

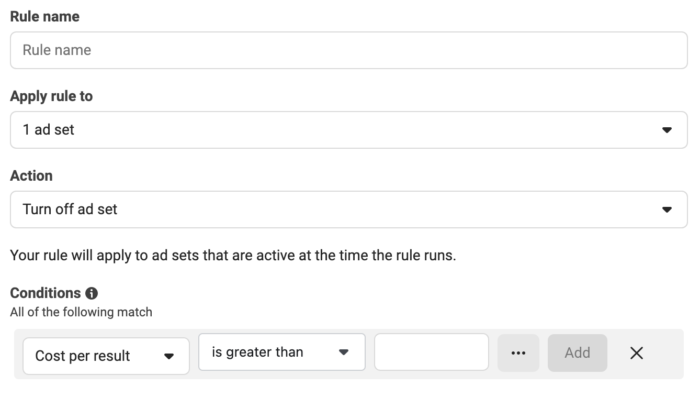
Sometimes, changes are made automatically based on rules that you set up. It may have been a rule you set up long ago that you completely forgot about.

These rules may pause your ads based on performance. Or you may automatically adjust your bid, which could impact delivery (as discussed earlier).

Make sure to check to see if you have any automated rules running and determine whether they are impacting active campaigns.

8. Performance Issues

If your ads are performing poorly, you may see delivery slow down and you may be less likely to reach your budget.

This is a good thing! And it’s a sign that you should try something else.

Check the Delivery Column

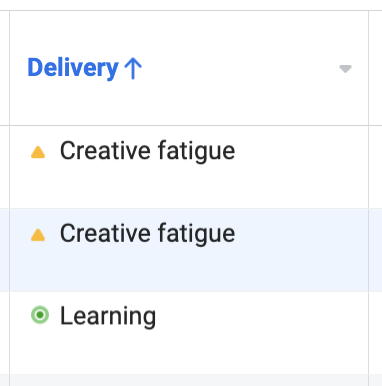
Oftentimes, the Delivery column will give you clues about why your ads aren’t delivering. Issues like Learning Limited and Creative Fatigue are the most common culprits that could lead to a drop in delivery.

Check the Activity History

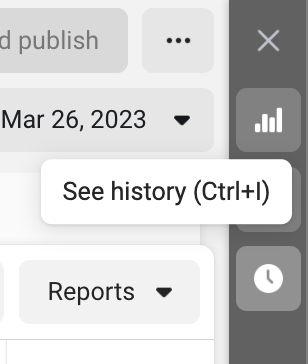
There are a couple of reasons that you should check your Activity History if delivery is an issue.

First, maybe there was a significant change or change you weren’t aware of that led to the drop in delivery.

Second, look for frequent changes or pauses that would negatively impact the delivery of your ads.

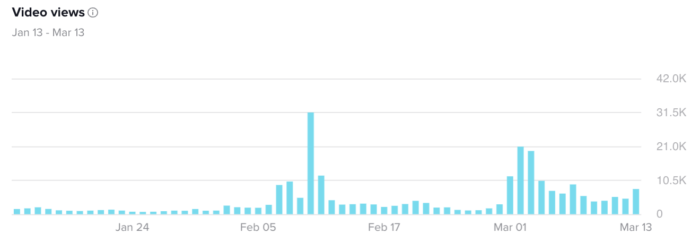
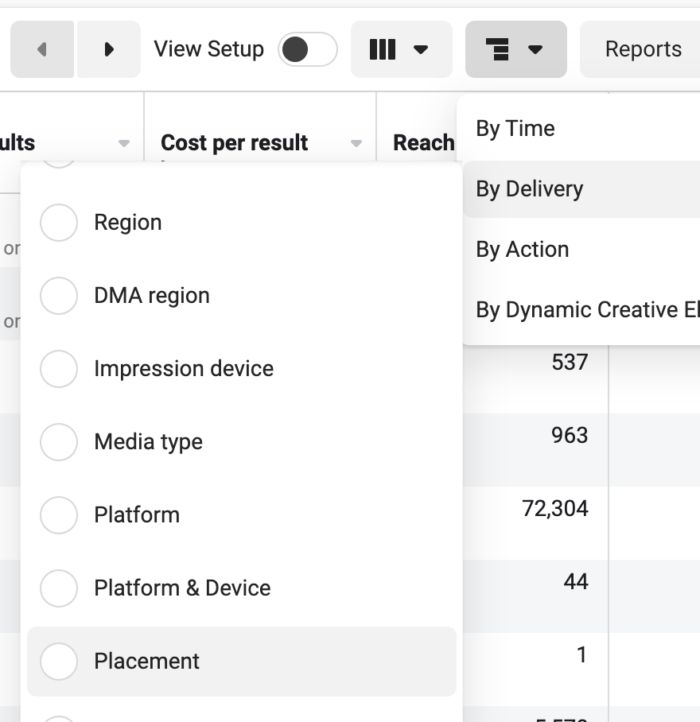
Use Breakdown by Day

Breakdown by Time Ads Manager

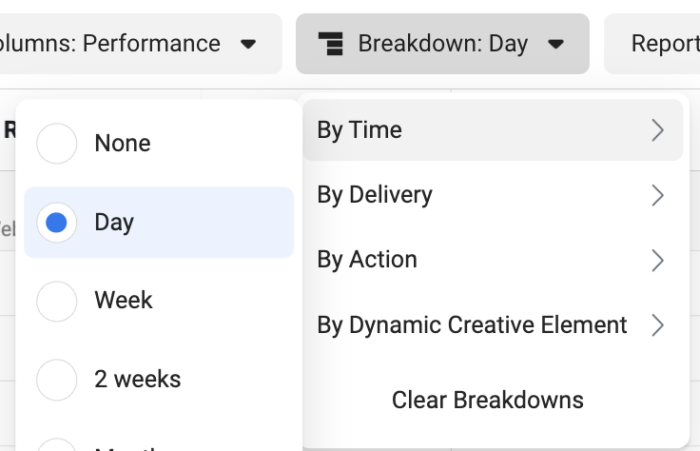
Another way to isolate what went wrong is to breakdown your ad performance by day. See if you can isolate when this problem began.

You should start with those problematic dates when looking at your Activity History.

Watch Video

I recorded a video about this, too. Watch it below…

Your Turn

Do you have issues with Meta spending your ads budget? Are there any other explanations that haven’t been listed here?

Let me know in the comments below!

The post Why Won’t Meta Spend My Advertising Budget? appeared first on Jon Loomer Digital.

Did you miss our previous article…
https://www.sydneysocialmediaservices.com/?p=5822

You should use Meta events to track important actions that happen on your website. While there are standard events for your typical transactions (purchase, lead, contact), I also use nine custom events that fire when important engagement occurs.

These events benefit Meta advertising. You can use them to add granularity to reporting, optimization, and even targeting.

My website prioritizes my blog. When advertising, my goal isn’t always a sale or lead — particularly when promoting my blog posts. In that case, I don’t just want empty clicks. It’s important that I’m driving quality traffic.

That’s where these custom events come into play. By using these events in my reporting, I can confirm whether my ads are leading to these critical actions.

The custom events you use will depend upon the actions you deem important. Make a list of those actions and figure out whether there is a standard event that can track them. If not, that’s when you can look to custom events.

I use Google Tag Manager to manage my pixel and create these events. I won’t provide a tutorial for creating all of these events here. But where possible, I’ll link to a tutorial I’ve already written about that particular event.

While reading and engaging with this post, you can bet these events will be firing…

1. 1 Minute Time on Page

A very basic signal of whether a visitor is actively engaged on your website is the amount of time that they spend on a page. Did they immediately abandon after arriving? Or did they stick around?

This is why I have a custom event that fires once a visitor has lingered on a page for one minute.

Tutorial for this event:

Create a Meta Pixel Event that Fires After Viewing a Page for 60 Seconds

2. 2 Minutes Time on Page

A one-minute visit is great, but it’s also not indicative of someone who got what they wanted and read an entire post. This is why I also have an event that fires at two minutes.

There are actually a couple of ways to set this up.

1. Use intervals. In this case, you could set up the 1-minute event fire in multiple intervals. I’ve done it this way in the past.

2. Create a separate event. You’ll set it up in the same way as the 1-minute event, but you’ll need to change the timer.

I’ve chosen to move to the second option because I will later combine it with a second event to create a new event. I could be wrong, but I don’t think I’d be able to do that if one event generated both the 1 and 2-minute fires.

3. Scroll Depth 50%

Of course, you could argue that even a two-minute visit may not be indicative of an engaged user. In theory, someone could click a referring link and land at the top of a page, only to walk away while the timer ticks away and events fire.

Another sign of an engaged user is scroll depth. Did the visitor scroll through the page? You can create a custom event that triggers off of the vertical scroll depth.

One consideration here is the amount of content that may appear below the body of your content. You may assume that you want a 100% scroll, but that will be incredibly rare — even for people who read an entire post.

What do you have below your blog posts? Is there a footer? Cross-promotion? A comment section? It’s possible that, especially due to comments, the amount of content below your post will be variable.

Because of this, I’ve decided to settle on a 50% scroll to be safe, but feel free to experiment with this.

Tutorial for this event:

Create a Meta Pixel Event that Fires After Scrolling 70% Down a Page

4. 1 Minute AND 50% Scroll

There are weaknesses in both the timer and vertical scroll depth approaches. Just as you could spend two minutes at the top of a post without reading, you could also scroll quickly without reading. Wouldn’t it be great if you could combine the two events?

You can! This event won’t fire unless a visitor spends at least one minute AND scrolls 50% down a page.

This is a clearer indicator of a quality visitor.

Tutorial for this event:

Create a Meta Custom Event That Combines Time Spent and Scroll Depth

5. 2 Minutes AND 50% Scroll

You had to know this was coming. What’s better than a visitor spending a minute and scrolling halfway down a page? Scrolling while spending two minutes on the page!

You could do this all day, of course. Feel free to experiment with increasing the time to three, four, or even five minutes. Of course, it will be helpful if you get good traffic if you want to do that.

A question that might come up: Why bother with the first four events at all when you can use this one?

It’s all about volume. It would be nice if we could get a lot of this event. But when we’re not, it’s helpful to see how close we’re getting based on time and scroll.

6. Podcast Play

I use an audio player to showcase related podcast episodes, typically at the top of my blog posts. Since this blog post doesn’t have such a related podcast, I’ll embed my player with an unrelated episode here…

When someone clicks play on my player, it fires an event. This is yet another sign of an engaged visitor.

I don’t have a tutorial for this one because I couldn’t tell you how to do it. I had to ask my tech team to do it, and it requires additional coding and brainiac stuff.

Above is what the trigger looks like, but keep in mind that the execution will depend upon the audio player you have. You probably won’t be able to copy what I do, but it’s something to consider getting done if you use an audio player on your website.

7. Shared Post

Like most blogs, I include social sharing buttons to help encourage sharing my content to different social networks. If someone clicks to share, that would be a really good sign.

I set this up myself, and I’m sure it could be done more intelligently. I have multiple triggers set up for simple clicks on the share buttons.

Of course, this doesn’t verify that someone completed the share, only that the share window was opened. But it’s something I track.

8. Internal Link Clicks

Another sign of an engaged visitor is someone who views multiple pages. You could create an event that fires based on the number of pages viewed. But, I did something that is a little more primitive (and should be just as useful).

This event triggers if someone clicks a link that includes “jonloomer.com” in the URL.

You could certainly have this fire on all link clicks, but I’m valuing keeping people on my website.

9. Video Watched

One more! I also often embed videos within my blog posts. It’s helpful to know if people are playing these videos, which is another sign of engagement.

While I’m sure there would be ways to execute these events regardless of the video player (and source platform), Google Tag Manager has a built-in trigger for YouTube videos.

Not all of my embedded videos are from YouTube, but this actually has inspired me to embed YouTube videos when possible, rather than TikTok or Instagram.

Tutorial for this event:

Create a Custom Facebook Event for a Watched YouTube Video in Google Tag Manager

Reporting, Optimization, and Targeting

As mentioned at the top, there’s a purpose to firing these events. The primary reason is reporting. I add columns for these events in Ads Manager so that I can see when my ads are leading to these actions.

We can also optimize for these events, rather than the standard link click or Landing Page View.

And finally, you can create a website custom audience based on your events and target people who perform these actions.

These are topics for separate blog posts!

Watch Video

I recorded a video about this, too. Watch it below (and yes, it will fire an event when you play it)…

Your Turn

These are the custom events that fire on this website. What do you use?

Let me know in the comments below!

The post 9 Custom Events That Fire on My Website appeared first on Jon Loomer Digital.

Did you miss our previous article…
https://www.sydneysocialmediaservices.com/?p=5749

Yeah, it’s one of those posts. I get that this is a vanity metric. By itself, it doesn’t mean much. But it’s a reflection of hard work. So, allow me to explain what I did to grow from nothing to 10,000 TikTok followers in a reasonably short period of time.

(NOTE: All while not selling my soul or worrying about trends).

I hit 10,000 TikTok followers today. Normally, I don’t make a big deal out of this stuff. But, this feels like quite an accomplishment given the dramatic shift I’ve made.

It would be safe to say that six months ago, this would have been laughable. I wasn’t active on TikTok, and I detested everything about it (and short-form video generally). But, by the end of September, I put my old man shoes away and realized that this was something I needed to do.

When I committed to it, I made a conscious decision to become the most followed account related to the topic of Facebook ads on TikTok. I’m obviously not there yet, but this is a nice milestone.

What I did was simple and complicated at the same time. It really comes down to two things…

Some Ads Early

The toughest part of getting started is publishing videos into the void. Maybe it was to give me a psychological boost or to make my profile look a bit more desirable in the early going, but I ran a low level of TikTok ads during the first couple of months.

From the time I committed to creating videos on TikTok in October through the middle of December, I collected 3,253 followers via ads. It was a nice foundation.

This was good and bad.

The bad: I tried really hard to target precisely to build my audience with relevant people. All indications are that this wasn’t successful. It was mostly numbers padding (the relevant followers would come organically).

The good: We can knock vanity metrics all we want, but it does mean something on TikTok if someone has a following. It surely helped convince some relevant people that I was worth following.

Did this lead to a significant spike in engagement during those first few months? Not really. But I do think that it helped me reach the next step.

A Dedicated Commitment to Create

Look, I could run ads forever on TikTok, but unless I was actually creating good content, it would not matter. I dedicated myself early.

I would create bad videos in the beginning, there was no avoiding that. But the goal was to get myself out of that phase as quickly as possible. I created 70 videos in October. It was a difficult, challenging, and inefficient month of video creation.

But it was worth it. I started to figure out my process. I found a workflow. Needs like software and lighting became clearer to me.

I dedicated myself to publishing at least one video per day in 2023. Truthfully, I missed very few days once I started in October, but I wanted to avoid any days off going forward.

I’ve kept to that commitment and I’ve published more than 260 videos on TikTok. Consistency, volume, and quality. More than anything else, I’d say that these were the keys to my growth.

What I Didn’t Do

I didn’t try to go viral. I didn’t worry about trends or popular sounds. Trust me, you’re going to hear a lot of advice around that stuff.

But it’s wrong.

If all you care about is being popular, sure. Chase that stuff. But you’re going to attract a very general, random audience. And that’s not how you build an engaged following around a specialty.

While I haven’t completely niched down on TikTok (I talk about Facebook ads, video creation, and entrepreneurship), it’s at least a similar category. I don’t want to attract randos who don’t care about any of these things.

The result: Engagement is growing with the audience size.

Tracking Growth

TikTok only offers analytics back 60 days, as far as I can tell. But even within the past two months, the improvement really jumps out.

Here’s the growth of my audience during that time…

Those spikes are when some videos took off. I have three recent videos that received more than 30,000 views (all organic).

Those three videos alone resulted in 2,942 new followers.

But it’s not just those three. Here’s a look at the trend of views during the past 60 days…

Even during the end of January, most days I’d receive very few views. But then something started to change. The floor raised.

Engagement is no longer focused on a few videos. I can now expect that my recent videos will almost always get at least 1,000 views. That was definitely not the case before.

If I were to push back just a few more days, it looks like this…

That doesn’t mean that this new engagement level will continue forever, but it’s certainly a good sign.

Persistence

What you don’t see here is the truly difficult times. I recorded, edited, and published a video every day, knowing that it may not result in much impact at all.

These might be the most important times.

These are the times when people quit. And I totally understand why they do. But you have to push through.

This is why it’s so important to have some overarching reason and motivation for doing what you are doing. I knew that I did not have a choice. This is what I was going to do now. And once I committed to a video per day, excuses were meaningless.

If you want to grow your audience — whether it’s social media, website traffic, a podcast, or your email list — it’s important to have this sense of purpose. It’s nice to be reassured by the positive metrics. But you can’t let the lack of progress suck the energy out of you.

Making Light of It

I recorded this video today about reaching 10,000 followers. Check out the acting as I have a conversation with “someone else” (also me).

@jonloomer

Waiting for 10 thousand followers on TikTok and debating how much it even matters…

♬ original sound – Jon Loomer

Join Me

I’m ready to share everything I’ve learned so far. I created a 37-lesson training with details about my experience, workflow, equipment, software, and more — not just about TikTok, but about the short-form video format itself.

Join me by signing up here!

Your Turn

Have you gotten started on TikTok or short-form video yet? What do you think?

Let me know in the comments below!

The post How I Grew to 10,000 TikTok Followers in Under 6 Months appeared first on Jon Loomer Digital.

Did you miss our previous article…
https://www.sydneysocialmediaservices.com/?p=5678

There is a common mistake made by Meta advertisers related to conversion rate and an attempt to scale ads. You can be better. Let’s make sure that you don’t make the same mistake.

Maybe this is you. There’s a temptation to try to outsmart the algorithm. But it’s unlikely to work…

Conversion Rate and Opportunity

Like any good marketer, you pay attention to your website metrics with Google Analytics. You are always looking for ways to optimize and improve performance. How can you leverage this information?

You notice that you have a 10-percent conversion rate on a particular product landing page. It’s the perfect combination of a good product, offer, and purchase flow.

You want to improve revenue. One way to do that would be to improve traffic to this high-performing product page.

The Mistake

You come up with an idea. You feel super smart and can’t believe you hadn’t thought of it before.

You know how to drive traffic with Facebook ads. You can do it very cheaply. This is the perfect way to scale.

If you send 100 people, you can expect 10 to convert. If you send 1,000 people, 100 will convert. What about a million?

This can all work because you did such a great job with your product landing page. All you need to do is send the traffic. The landing page will do the rest.

So, you set up a campaign with the primary goal of sending the most traffic possible at the lowest cost. You run a Traffic campaign that is optimized for Link Clicks or Landing Page Views.

Now, you sit back and wait for the profit to roll in…

The Results

That campaign sends a ton of traffic. And yet, no conversions. Nothing.

You wait a while longer. You spend $100. Then $1,000. You’ve sent thousands of people to that amazing product landing page. You might get a sale or two, but that’s it.

Something is wrong. People are clicking on your ad, so they are clearly interested in your product. But virtually no one is buying.

What happened to that amazing conversion rate? What was once 10 percent is now well under 1 percent. You went into this excited about the prospects of big profits and you’ve actually lost money.

You are angry with Meta. There’s no reason that this should happen. It doesn’t make sense.

What Went Wrong?

It’s simple, really: You tried to outsmart the algorithm.

You made assumptions, and that is never a good idea. You assumed that the traffic that appears in Google Analytics is the same as the traffic that you could send with a Facebook ad optimized for clicks.

You assumed that if people clicked your ad, they must be interested in your product. And since the landing page is effective, a predictable percentage of that traffic should result in sales.

But that’s not what happens when you optimize for Link Clicks or Landing Page Views. You’ve learned an important lesson: Not all clicks are created equal.

It’s quite possible that the 10 percent conversion rate reflects organic traffic. The people who made their way to this landing page did so on their own. Your links, emails, and marketing messages helped. But it wasn’t algorithmic.

Meta’s ad algorithm had only one concern when you created your ad set optimized for Link Clicks or Landing Page Views: Get Link Clicks or Landing Page Views at the lowest cost.

Nothing else. No concern about what those people do after landing on your website. It doesn’t matter.

So, the algorithm will find advantages — even weaknesses — in the system to find you cheap clicks. It could be people who just click everything. It could be accidental clicks due to the placement. It might even be click fraud that hasn’t yet been flagged by the system.

But that traffic will not be nearly as good as what you normally get.

What You Should Do

Don’t overcomplicate this. If you want to increase purchases with your ads, run a Sales campaign that is optimized for purchases.

The reason is simple: The algorithm will distribute your ads and make adjustments to delivery based on how well you achieve that goal.

If you optimize for Link Clicks or Landing Page Views, the algorithm will focus on that. If you optimize for Purchases, the algorithm won’t be happy unless you’re getting sales.

Of course, you’re going to see that surface-level metrics may look nicer when optimizing for the click. You’ll get sky-high Click-Through Rates and lowest-of-the-low Cost Per Clicks. You will need to spend more to get clicks when optimizing for conversions, and that can be misleading.

You need to remember that the 10 percent Conversion Rate (or whatever that rate may be) is not in a vacuum. That rate will not hold, regardless of the traffic that you send. It would be nice, of course, but that’s not reality.

If you are unable to optimize for a Purchase, work your way back through the funnel from there. Try Initiate Checkout, Add to Cart, or even a custom event for a Quality Visitor. But the last resort should be be Link Clicks or Landing Page Views.

Even then, you’re likely burning money.

Watch Video

I recorded a video about this, too. Watch it below…

View this post on Instagram

A post shared by Jon Loomer (@jonloomer)

Your Turn

What have been your experiences with the expected Conversion Rates with Meta advertising?

Let me know in the comments below!

The post Do Not Make This Mistake with Conversion Rate and Meta Ads appeared first on Jon Loomer Digital.

Did you miss our previous article…
https://www.sydneysocialmediaservices.com/?p=5473

If you’re an experienced Meta advertiser, you probably know full well that Audience Network is a problematic placement. But, the question should be asked: Should you ever use it?

If the answer were a definitive “no,” this blog post would be over right now. Of course, it’s a bit more nuanced than that.

In this post, we’ll explore the issues with the Audience Network placement and provide some clarity around when Meta advertisers should and shouldn’t use it.

What is Audience Network?

Audience Network is one of the many options to pick from if you manually select placements in Meta Ads Manager.

It’s one of the four platforms…

Or you can individually select from placements within the Audience Network platform under Apps and Sites…

But… What is it?

Mobile developers can monetize their apps with the help of Audience Network. It’s how many free apps remain free to use.

Ad placements are placed within these apps. Advertisers can then reach their audience while using these apps.

It’s a rare situation when your Meta advertising dollars are spent to reach people while they aren’t using one of the Meta family of apps. They are still the people you are hoping to target, but you reach them while they aren’t on Facebook, Instagram, or WhatsApp.

So, what could possibly go wrong?

The Problems with Audience Network

This is something I’ve covered extensively in the past. In fact, the issues related to Audience Network were highlighted in my blog post about my optimization test related to driving quality traffic.

In that post, I discovered that when optimizing for Link Clicks or Landing Page Views to promote a blog post, nearly all of my budget was spent on this placement. Why? Because this placement consistently drives very cheap clicks.

That, of course, isn’t necessarily a bad thing. But when you dig deeper, you see why it is.

Most of these clicks are very low quality. Most who click immediately abandon your website and rarely stick around to do anything of substance.

Why that is can be attributed to accidental clicks if not outright click fraud. In fact, if you’ve ever received a refund from Meta for your ads, it was likely due to a click fraud violation on Audience Network.

It’s funny, but most refunds I’ve seen are like this. Just a few pennies. But the common theme is that Audience Network is almost always mentioned.

It’s why you may get results that seem too good to be true when optimizing for Link Clicks or Landing Page Views. You’ll drive lots of traffic, but none of those people do anything else. And they probably abandon your website immediately.

I’ve also determined that the Audience Network Rewarded Video placement can be problematic. It can lead to inflated numbers because users are rewarded for watching a video to get something in exchange.

While you can make the argument that Rewarded Video is still okay because someone watched at least 15 seconds of your video, I’ve found that these people almost never do anything else that would suggest they cared about the video. It leads to misleading results.

More often than not, if you have results that seem too good to be true, it almost always turns out that they are — and that Audience Network is the culprit.

When Should You Remove It?

I’ve provided the roadmap in the section above for when you should be skeptical of this placement. But, let’s be clear.

If you’re optimizing for Link Clicks or Landing Page Views, Meta’s ads algorithm will spend a large portion (maybe even most) of your budget on Audience Network. Why? Because you told the algorithm you want the most clicks possible at the lowest cost, and that’s the easiest way to get them.

I’m going to assume that you care about the quality of those clicks, even though Meta doesn’t. If that’s the case, make sure to turn off Audience Network when optimizing for either Link Clicks or Landing Page Views.

The other time to be cautious is when optimizing for ThruPlay.

Because this placement rewards users who watch an entire video with virtual currency, you will get an insane number of ThruPlays. In fact, you may see numbers that don’t make any sense.

Reach ThruPlay

In the example above, there were actually more ThruPlays than people reached. I don’t care how engaging your video is. That does not happen unless manipulation is involved.

Maybe you’re okay with a volume of clicks and you don’t care what those people do. Maybe you’ve found that the quality of traffic you’re getting is better than I’ve seen.

And maybe you’re okay with a high number of rewarded video plays. You don’t care that it doesn’t mean that these people are as interested in your video as the numbers may suggest. Or maybe you’ve seen good results from them.

Just be aware of the potential issues in both cases. I’m not saying you’re crazy if you don’t turn Audience Network off when using these optimization options. Find what works for you.

But make sure that you know the risks involved. (And you might be slightly crazy if you leave it on in these cases.)

When Should You Use It?

I hope I’ve made a good argument for why you should be wary of Audience Network. But, be careful not to overcorrect.

Many experienced advertisers understand the placement’s reputation. In response, they always turn it off. If you understand how optimization works, this actually isn’t necessary.

It all starts with the Performance Goal in the ad set. You tell Meta your goal metric that determines success. Some goal metrics (Link Clicks, Landing Page Views, and ThruPlays) can be inflated by weaknesses in the Audience Network placement.

But, here’s what you need to remember when it comes to how optimization works: If a placement doesn’t help you achieve your goal, less of your budget will be spent there.

So, let’s assume you’re running a campaign for any type of conversion. It could be sales, leads, or even a custom event for quality traffic. In this case, there’s really no need to manually select placements.

I know, we old-school advertisers did this all the time back in the day. But, the algorithm learns very quickly what works and what doesn’t. If a placement isn’t leading to positive results that contribute to your goal, less of your budget will be spent there.

Remember that split test I did for quality traffic? Nearly all my budget was spent on Audience Network when optimizing for Link Clicks or Landing Page Views. But when I optimized for the Quality Visitor custom event (2 Minutes + 70% Scroll), not a penny was spent there.

If there’s no way you can get misleading results, don’t worry about it. Can the placement result in accidental purchases? Accidental leads? While you can get lower-quality leads, it’s unlikely due to the placement.

So, if you’re optimizing for a conversion of any kind, let it ride with Advantage+ Placements and keep Audience Network on.

It’s possible that not a penny will be spent there anyway. Most importantly, making all placements available may keep your costs down.

Your Turn

How do you treat the Audience Network placement? Do you always turn it off? Sometimes?

Let me know in the comments below!

The post Should Meta Advertisers Ever Use the Audience Network Placement? appeared first on Jon Loomer Digital.

Did you miss our previous article…
https://www.sydneysocialmediaservices.com/?p=5408

And here we go. In an effort to increase authenticity and (let’s be honest) diversify revenue opportunities, a test Meta Verified subscription product will begin in New Zealand and Australia this week.

Let’s dig into what this actually is, some confusion about who is eligible, my issues with it, and whether I’ll ever consider a verified subscription.

For Creators Only (For Now)

To be eligible for the Meta Verified test, you need to be a creator with prior posting history in New Zealand or Australia who is at least 18 years old.

Now, there is some confusion (at least I’m confused) about whether a “creator” can be a personal brand on a Facebook page and be eligible. We’ll get to that later.

Subscription Bundle

A Meta Verified subscription will cost you $11.99 (US) per month from web or $14.99 per month on iOS and Android. Yeah, I don’t know why anyone would sign up via iOS or Android.

The subscription bundle includes the following benefits:

1. Verified badge. This isn’t as simple as paying to get verified (not mentioning any platforms). Your account name and photo must match your governmental ID.

2. Proactive account protection against impersonation. Apparently this doesn’t happen now for verified accounts? Or it’s better somehow? Or maybe it’s just that anyone can get the same protection as currently verified accounts, but you’ll need to pay for it.

3. Access to account support. That’s right, real people. Cut through the red tape.

4. Increased visibility and reach. You’ll show up more prominently in search, comments, and recommendations. How noticeable this increase is will vary depending on your audience size and topics.

5. Exclusive features. This appears to be related to stickers and stars on Facebook and Instagram Stories and Reels. Could be access to other features, but these aren’t specified in the announcement.

Creators with Business Pages?

Now, here’s where it gets a bit confusing and where media messaging is inconsistent with the official announcement from Meta…

Meta notes that this is for Creators only. Businesses are not eligible for the test, but the eventual plan includes them.

But… Does that mean that only “creators” who utilize user profiles are eligible? What about creators who set up Facebook pages?

This may seem like semantics, but Meta never mentions “user” in their announcement. And their documentation about becoming a creator mentions “turning on professional mode on your Facebook profile or by creating a separate Page.”

We know that businesses aren’t eligible for the test, but it’s not clear if personal brands (creators) who set up a Facebook page are. Maybe?

The final section of Meta’s announcement does repeatedly mention profiles and your birthday, which would be unique to a user.

But since Meta’s own definition of a creator includes personal brands with pages, I can’t say for sure if such people are excluded.

My interpretation: If you are a personal brand with a Facebook page that utilizes your actual name (that is the same as your governmental name), you are likely eligible.

I’m hedging with “likely,” but I’d love clarification from Meta on this.

No Changes to Accounts Already Verified

Of course, you may have an account that was previously verified without paying for anything. No worries, Meta says. No changes to your account while Meta tests and learns.

Wait, no changes? Yeah, no changes. That basically means you don’t get the benefits of the Meta Verified subscription because you aren’t paying for it.

I’m not really sure what will eventually happen to accounts like mine that are verified under the old system. Different badge? Get some benefits? Forced to pay?

I’ve gotta think that the verification will stand since these accounts did go through a rigorous verification process. But I’m sure they’ll (we’ll) never receive the full benefits of a subscription without paying

There’s Good and Bad Here

Look, I don’t love this, but some of it makes sense.

First, it gives more people the ability to get verified. That’s long been a struggle. And the more people who get verified (actually verified with governmental ID), the more authentic the platform becomes.

Second, it’s good to provide priority access to better support, a huge issue with the plaform currently. This should have been an option 10 years ago. But it’s also an admission that support ain’t great for the rest of us.

Third, Meta needs to diversify instead of relying so heavily on advertising. This is a step in that direction.

But, some bad…

You’re going to get some complaints from advertisers who spend some big budgets but still get low-quality support. If these new subscribers get superior support to advertisers, that’s a problem.

There is bound to be some confusion, at least initially. Whenever you change the meaning of something, that’s going to be the case. While “verified” still means that the account was verified (which is important), you don’t need to have any level of notoriety to get verified. Some will take advantage of that.

This also has the potential to tick off those who were previously verified, especially if such accounts (eh hem) aren’t handled delicately.

This at least feels cleaner than the Twitter Blue product, which doesn’t require governmental ID account verification. Meta Verified extends the original purpose of the checkmark, which is to make sure people are who they say they are and prevent impersonation.

Overall, this is a mixed bag that could become more attractive if Meta handles it the right way.

Will I Do This?

At the moment, I don’t think I’d be eligible anyway. Even if personal brand pages are eligible, the “Jon Loomer Digital” name may not be since it’s a business name.

This also kinda sucks for someone who has been verified for the past several years. I assume Meta will eventually force me to remain verified.

But the other issue is regarding the benefits of being verified up until now. I still see pages impersonating mine. I report them. I don’t know how much it matters that I’m verified during that process.

I also have doubts that I currently get better support than anyone else because my page is verified under the old system.

So, you want me to pay for this new verification? Don’t mind me. I’m going to resist for now. I’m bitter.

Your Turn

What do you think about Meta Verified? Will you pay for it?

Let me know in the comments below!

The post Meta Verified Subscription Test Begins appeared first on Jon Loomer Digital.

Did you miss our previous article…
https://www.sydneysocialmediaservices.com/?p=5253

Last week, I wrote about how to create a custom event that fires when someone views a page of your website for 60 seconds. Now let’s create an event based on scroll depth.

This is all about finding a way to show Facebook what a quality website visitor is. You can use this for reporting, optimization, and targeting.

The 60-second visit is pretty solid, but it has a weakness: What if someone sits at the top of the page for 60 seconds? That is clearly not a quality visit.

That’s why you should also consider scroll depth. Someone who scrolls through much of your post is likely a quality visitor.

Like with the time on page event, I originally wrote about this three years ago but made it way more complicated than it needed to be.

So today, we’re going to make this super easy. From there, you can add complexity if you want.

Your Base Pixel Code

We’re doing this in Google Tag Manager. If you aren’t already using GTM to manage your pixel, you’ll need to first create a tag that fires the base pixel code by itself.

You’ll do this — and create your events — by creating a new tag. Use the Custom HTML tag type and paste your base pixel code.

After naming it, you’ll need to configure the triggering. Use the Page View trigger and have it fire on all pages.

What is Quality Scroll Depth?

Before we create this event, we should discuss what quality scroll depth looks like. The assumption is that you’ll want to use 100% or something close to it. But, that may not be ideal.

A typical blog post may actually have a lot of content that people don’t read after the article itself. You may have comments, a footer, and maybe some other widgets and ads. The amount of scroll may be variable depending on the length of your article and the amount of comments you have.

So, keep this in mind. It’s possible that 70% is too high a barrier that may not be reached even when people read an entire article. While I use 70% in this example, it could just as easily be 50% or something else.

Scroll Depth – 70% Event

Now let’s create this bad boy.

Create a new tag and name it. I’d name it “Facebook – 70% Scroll,” but name it whatever you want.

You’ll use the Custom HTML tag type again, and use the following code:

<script> 
fbq('track','Scroll Depth Event');
</script>

The name you use in the code is what appears in your Events Manager, so keep that in mind.

Don’t forget to turn on Tag Sequencing to have the base pixel code tag fire first. This is within the Advanced Settings under the Custom HTML.

Below that, click to configure your trigger and then click the “+” to create a new one. Select the “Scroll Depth” trigger type.

Check “Vertical Scroll Depths” and enter “70” (or whatever percentage that you want). Note that you could have tracked by pixels instead of a percentage.

The trigger will look like this…

When you’re done, your tag will look lik this…

Use the Preview feature to test it out if you need to. Then publish your new tag and trigger.

Use for Reporting

This will be great for providing more context of your results in Ads Manager. While you might be able to simply add a column for your custom event to your report, there seems to be a bug that doesn’t always make this possible.

If that’s the case for you, create a custom conversion that maps to the custom event.

Now you should be able to add your custom conversion to your report as a new column.

Quick Tip: You may want to rank these events in your top eight for Aggregated Event Measurement if you have room. This will assure that the results are more complete.

Use for Optimization

I’ve long complained that Facebook doesn’t provide a built-in way to optimize for quality traffic. Instead, you optimize for landing page views or link clicks, and that almost always results in low-quality clicks.

But, there’s an alternative. While the jury’s out on whether Facebook actually learns from custom event activity, it’s certainly better than low-quality clicks.

Create an Engagement campaign.

Select “Website” as your conversion location within the ad set.

Finally, select “Maximum number of conversions” as your Performance Goal and then your pixel and conversion event.

Scroll Depth will now be the focus of your “Results” column.

Use for Targeting

You can also target the people who scrolled on your website. Create a website custom audience that is based on your events.

If you want, you can actually refine by the exact page that was scrolled.

Watch Video

I recorded a quick video on this, too. Check it out…

View this post on Instagram

A post shared by Jon Loomer (@jonloomer)

Your Turn

Have you ever used a custom event like this one? What do you think?

Let me know in the comments below!

The post Create a Meta Pixel Event that Fires After Scrolling 70% Down a Page appeared first on Jon Loomer Digital.

Did you miss our previous article…
https://www.sydneysocialmediaservices.com/?p=5128

Quality traffic is important. When you run Facebook ads that direct people to your website, you care whether people immediately leave or if they spend more time there. That’s why custom pixel events are so important.

What I’m going to describe is done with custom events and Google Tag Manager. Once you create such an event, you can use this for reporting, optimization, and targeting. It’s super useful, and I continue to take advantage of this today.

I wrote about these custom events nearly three years ago. But looking at that original blog post, I realize now that I made it way more complicated than it needed to be.

So today, let’s make this as simple as possible. When we’re done, I’ll provide specific examples of how this can be used as well as ways that you can make it more complicated if you really want to.

Your Base Pixel Code

I’m assuming at this point that you’re already using Google Tag Manager to manage your Meta pixel. But if you’re not, this is an important step. You’ll need to create a tag for the base pixel code that fires separately of any events.

When you create a tag, select the Custom HTML tag type. Then paste your base pixel code. It’ll look something like this…

Name it something that makes sense like “Facebook – Base Pixel.”

Then configure the triggering. You’ll select the Page View trigger and want it (presumably) to fire on all pages.

This is one of those things you can change if you really wanted to, but I’m trying to keep this tutorial simple.

Time on Page – 60 Seconds Event

Now it’s time for the fun stuff.

Create another tag and name it something like “Facebook – 60 Seconds.” The names of these things are for you only, so don’t stress over what they are.

Once again, you’ll want to use the Custom HTML tag type. Here is the code in the simplest form that you can use:

<script> 
fbq('track','Time on Page 60 Seconds');
</script>

You can add parameters if you really wanted, but let’s stick to the basics.

We’ll want to use tag sequencing and make sure that the tag for your base pixel code fires first.

The top part of the tag will look like this…

You’ll want to create a new trigger. Select the Timer trigger type.

For whatever reason, the interval is in milliseconds. So, for 60 seconds, it will need to be 60000 milliseconds. Set the limit at “1” and create a rule that will fire on every page like the one I used below.

This is another area where you could get more complicated and have it fire every 60 seconds instead of just the one time. But, again, we’re keeping this simple.

When you’re done, it looks like this…

You can use the Preview feature to test it out, but otherwise publish your changes. If you’re using the Facebook Pixel Helper Chrome Plugin, you can see the event fire on your website once you’ve been on a page for 60 seconds (you may need to clear cache).

Use for Reporting

You’ll be grateful that you have this for reporting. Customize your columns and add a new column for this custom event. Of course, I’ve found this part to be buggy since not all custom events appear within this section.

If that happens to you, we’ll need to create a custom conversion mapped to the custom event. It will look something like this…

You have to create a rule, which is why I use URL contains “/”.

Once you create the custom conversion, you should be able to add it to your columns in Ads Manager. My saved columns consist of all sorts of custom events (and custom conversions mapped to custom events) based on quality traffic actions.

Quick Tip: Keep in mind that these events aren’t unique. One visitor can view multiple pages for 60 seconds, for example. Additionally, conversions are reported by default based on the 7-day click and 1-day view attribution window. You may want to limit it to 1-day click to get a more accurate view of engagement post-click.

Use for Optimization

It’s insane that Facebook doesn’t offer the ability to optimize for qualilty website traffic. But there is an option to try.

Instead of optimizing for link clicks or landing page views (which can lead to low-quality traffic), consider using time on page as your optimization event. Here’s how you’d do it.

Use the Engagement objective.

In the ad set, select “Website” as your conversion location.

Set “Maximum number of conversions” as your Performance Goal. Then select your pixel and conversion event.

I’ve heard mixed messages on whether Facebook actually learns from and optimizes for quality traffic in this case, but I still find myself using this often when promoting blog posts.

Use for Targeting

Keep in mind that Facebook has many built-in methods for targeting quality traffic, including an option based on time spent.

But you can also create an audience based on this event.

This is a great audience for remarketing

Make it More Complicated

The event I had you create here was super simple and shouldn’t cause too many technical hurdles. If you want to make it more complicated, read my original blog post about this. In that post, I talk about using variables and firing events every 30 seconds. You can also have it fire on specific pages. The instructions in that post also include some basic parameters that I don’t use here.

And if you want to take it even further, I created an event that combined time spent and scroll depth. Admittedly, that may be taking it a bit far! But that’s how I ended up creating a broader “Quality Traffic” conversion event.

Your Turn

Do you create custom events like this one for tracking quality traffic? What do you do?

Let me know in the comments below!

The post Create a Meta Pixel Event that Fires After Viewing a Page for 60 Seconds appeared first on Jon Loomer Digital.

Did you miss our previous article…
https://www.sydneysocialmediaservices.com/?p=5050

On one hand, we’re entering an AI Renaissance. ChatGPT and AI tools are exploding into our lives and will soon change the way we work, live, and play. And yet… Facebook still sucks at detecting basic fraud.

These may sound completely unrelated, but they’re not. These two things contradict each other in laughable ways. We’re preparing to bow to our robot overlords. Facebook/Meta is one of the techiest of all tech companies and is known for advancements in ads optimization and machine learning.

So… Why does Facebook suck so bad at this? How can we explain it? How does Facebook explain it?

I’m sure that these things are more complicated than I can ever understand. But, as you read this, you are likely to detect some anger. I’m annoyed. I’m exhausted. I’m tired of trying to explain why this is still a thing. And as much as I want to defend Facebook and the technical nature of managing this stuff, I remain at a loss for understanding.

What I’m going to describe was originally a minor annoyance. Scams that most people realized were scams and Facebook made some minor attempts to eliminate them. But as time has passed, it’s simply inexcusable that this stuff still exists.

Businesses are getting hurt by it. And that, ultimately, hurts Facebook.

The Phishing Scam

What I’m going to describe won’t be shocking. You’ve likely seen a variation of this before. There are a couple of versions of how this phishing scam works.

Most work because they create a Facebook page and then a post that claims you have violated terms. The page either tags a bunch of pages or emails them to drive traffic to this post.

Here’s an example (Note: I’m blocking the link in each of these scams to protect my readers)…

Facebook Scam

It indicates that your account is going to be deleted if you don’t act. Click that link to appeal, it says. Of course, that’s no Facebook link. You can bet it’s a phishing link.

Here’s another…

Facebook Scam

And another…

Facebook Scam

That post is amazingly from October. Still up today.

Have you noticed a common theme? I’m able to find all of these easily because they’re all under the name “Restriction Details.” All are different pages.

There are lots and lots of them.

Facebook Scam

Some of these pages are new. Some have been around a while. They use different names, too. In some cases, even the Facebook or Meta name and logo are used.

If you initially get an email directly from the scammer, you may immediately realize it’s fake because of the return email address. But…

That email could also come, amazingly, directly from Facebook. You could get that email from Facebook if you get notifications sent to you that way.

Here’s an example of such an email…

Facebook Scam

Do you see what’s happening here? This email is actually from Facebook. It’s sent to notify you that a page has tagged you. There’s a very scary message in that email and a phishing link within it.

An unsuspecting victim could see that it’s actually from Facebook and assume that the message within it is also from Facebook. That is one of the primary ways these scammers get people to click that phishing link.

This is so bad that Facebook even suggested one of these posts in my news feed.

Facebook Scam

People are getting harmed by these scams. And Facebook isn’t doing nearly enough about it.

Why is This So Hard?

Look. I’m tired. I’m tired of reporting these posts for spam and scams every two or three days. And you know what’s crazy? Most of that reporting does absolutely nothing.

Here’s Facebook’s update on a post I reported back in August.

Facebook Scam

They’ll notify me when my report has been reviewed. I guess that hasn’t happened yet.

In some cases, these pages use Facebook or Meta branding. That should be easy. There’s no reason that such a post should get through.

Beyond that, we see that so many of these pages have similar or identical names. Once the first 100 are flagged, how can we not prevent future pages from popping up?

And some of these pages have existed for many months. You know that people are reporting them. How do they still exist?

This scam isn’t sophisticated. The posts follow a very limited playbook. They say that you violated terms. You have a short period of time to act before your page is going to get taken down. Click this shady link to dispute.

We now have AI that can respond to a loosely-structured question and give us the exact answer that we needed in a conversational tone. Crazy Star Trek stuff.

And yet, Facebook can’t detect a pattern with these pages and posts. I’m no programmer, but this seems like elementary-level detection that’s required compared to what we’re seeing with AI right now.

Why Does Facebook Suck At This?

Okay, I’m not done. Here’s another pathetic example of Facebook scam and spam detection.

Back in June, Facebook announced that they were going to improve business reviews and recommendations. You see, spammers and scammers would use recommendations because they aren’t as easy to remove. Why? Because pages can’t simply remove a negative review.

So, that June update was expected to improve the authenticity and trustworthiness of reviews. Did it? Nope.

Just today, my page received this review…

Facebook Scam

Wanna know what’s funny? I meant to share a screenshot of a different spam review that was left for me early this morning. But this one just came in a few minutes ago.

Once again, they all follow the same playbook. Completely unrelated to my business. Something to do with money. And then an email address, phone number, or WhatsApp number (or combination).

An authentic review wouldn’t include contact info. Why would it? Any review that includes such information should be an immediate red flag.

At this point, I probably get 20 spam reviews for every one authentic review. It’s made the entire system pointless.

And Facebook either can’t or won’t do anything about it. Or anything meaningful.

This is Going to Get Worse

Look, I get that this stuff is obvious to many of us. It’s really not hard for me to detect spam and scams, report them, and remove them (if possible). But there are two things to keep in mind here.

First, not everyone is as tech-savvy and knowledgeable as we are. These do fool some people. This is harming a large enough group that the scammers remain out in force.

Second, the scams might be easy for us to detect now, but they’ll get far more sophisticated. Why? That same AI advancement that Facebook isn’t using will be used by the scammers to blend in with authentic posts.

Your Turn

This exhausts me. What do you think? What should Facebook do to get rid of this nonsense?

Let me know in the comments below!

The post It’s an AI Renaissance, and Yet Facebook Sucks at Detecting Basic Fraud appeared first on Jon Loomer Digital.

Did you miss our previous article…
https://www.sydneysocialmediaservices.com/?p=5009

Facebook Ads Manager is changing all the time. There were three recent changes that may not have been big enough to create a lot of noise individually, but you need to be aware of them.

In this post, we’ll discuss the following:

  1. The return of conditional formatting
  2. The return of conversion breakdowns
  3. The loss of Instant Articles placement

Let’s go…

Conditional Formatting is Back

It was just a week ago. It feels like yesterday. I wrote a blog post lamenting the disappearance of conditional formatting.

Well, it’s back.

I don’t know what happened. But conditional formatting has returned to your custom ad reports. And this is good news because it’s a valuable tool.

You can access it in one of two locations (reminder: This is in the custom ad reports, not the main Ads Manager):

1. The header row drop-down menu.

Facebook Ads Conditional Formatting

2. The “Format” button.

Facebook Ads Conditional Formatting

I prefer the header row menu since it’s one less step to format the metric that I want.

You can format cells based on a single color or a color scale.

Facebook Ads Conditional Formatting

I prefer the color scale, so let me show you a quick example.

Facebook Ads Conditional Formatting

With a green/white/red scale, I can automatically assign colors to cells depending on whether results fall within the bottom, middle, or top of the scale (signifying good, average, and bad).

Here’s an example of what that might look like…

Facebook Ads Conditional Formatting

It’s a great tool to quickly get a visual on how your ads are performing. Read this blog post for more details on conditional formatting.

Conversion Breakdowns Return

Back in November, Facebook announced that breakdowns of conversion reporting would return after a long, post-iOS 14 hiatus.

I didn’t have this right away. Admittedly, I mostly forgot about it. Eventually, I’d see it in my custom ad reports, but I still wouldn’t have it in my main Ads Manager.

And then today, I finally saw it…

Conversion Breakdowns Facebook Ads

So, a quick recap of what happened is in order. When Facebook made a bunch of changes in response to iOS 14 opt-outs, one piece of functionality that was lost was the ability to breakdown conversions.

For example, go to the Breakdown drop-down menu and choose to breakdown by Placement.

Facebook Ads Breakdown

Previously (and post iOS 14 changes), you would get a total for conversions but you wouldn’t see how that metric broke down by placement.

Facebook Ads Breakdowns

You would get these breakdowns for other metrics, but not for any type of conversion (standard events, custom events, or custom conversions).

Now, of course, that is back.

Facebook Ads Breakdown

This is super useful. Until now, we didn’t truly know how segments like age, gender, country, and placement performed. We could get breakdowns of surface-level metrics, but not conversions.

If you don’t have this yet, it appears to be rolling out now.

Instant Articles Placement Going Away

Finally, you may have noticed this update if you’ve manually selected placements recently.

Facebook Instant Articles

We already knew as of October of last year that Meta planned to retire the Instant Articles format in April. This is a good reminder.

If you have ads running to the Instant Articles placement, you shouldn’t see an interruption of delivery. Your ads will keep running, but they’ll no longer run to that non-existent placement.

I’ve seen that less than 1% of my budget is spent on this placement, so it’s hardly a big loss. Still, advertisers prefer to see the addition of placements rather than subtraction. This means less ad inventory, which can lead to higher costs (even if it isn’t noticeable).

Your Turn

Have you noticed any other big changes?

Let me know in the comments below!

The post 3 Recent Facebook Ads Manager Updates appeared first on Jon Loomer Digital.

Did you miss our previous article…
https://www.sydneysocialmediaservices.com/?p=4932