Maybe your ads are running, but Meta doesn’t spend your entire budget. Or maybe your ads won’t deliver at all.
Why??
It’s a common issue. Let’s break down the potential explanations for what might be happening and how you can address it.
1. Your Audience is Too Small
This one’s rather logical, but some advertisers still miss it.
If your goal is to target a very small audience and set a budget that may be suitable for a larger audience, you shouldn’t expect your entire budget to spend.
You may see that your budget spends initially, but it may struggle with time — particularly if performance wanes.
If this is your issue, consider expanding your audience or lowering your daily budget.
2. Using Ad Set Spend Limits
If you are using Advantage Campaign Budget (formerly known as Campaign Budget Optimization), you have the option of setting an ad set spend limit (or minimum). This may lead to delivery issues.
Any time you attempt to restrict the algorithm, your actions may impact delivery. If you’re going to use Advantage Campaign Budget, it’s recommended that you refrain from setting ad set spend limits, except in extreme situations.
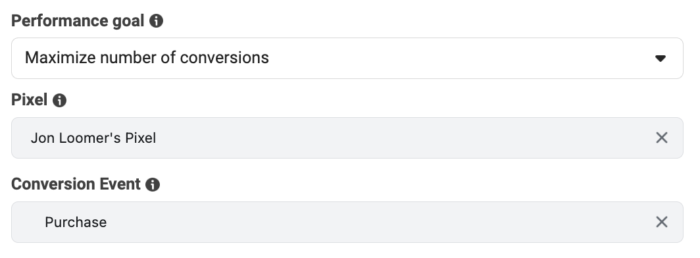
3. Cost Per Result Goal or Bid Control
By default, Meta’s algorithm will attempt to get you the highest volume of optimized actions at the lowest cost. But you can choose to override that and enter a Cost Per Result Goal or Bid Control.
By doing so, you are restricting the Cost Per Result or bid based on your goals. The impulse might be to set an unrealistic Cost Per Result Goal or bid in an attempt to lowball the algorithm.
The result will almost never be magical results. Instead, expect to get under-delivery. If you’re going to use these options, be careful to set reasonable cost and bid controls.
Read here for more information on manual bidding.
4. Optimization Event
Your optimization event matters. Meta recommends setting a budget high enough to get at least 10 optimized actions per day (multiply the expected cost per optimized action by 10). Similarly, you may need to generate up to 50 optimized actions per week per ad set to exit the Learning Phase.
If you are unable to set a budget that is high enough to accomplish these goals, you may find yourself in Learning Limited. This often results in restricted delivery.
When this happens, consider switching to an optimization event that will result in more daily volume.
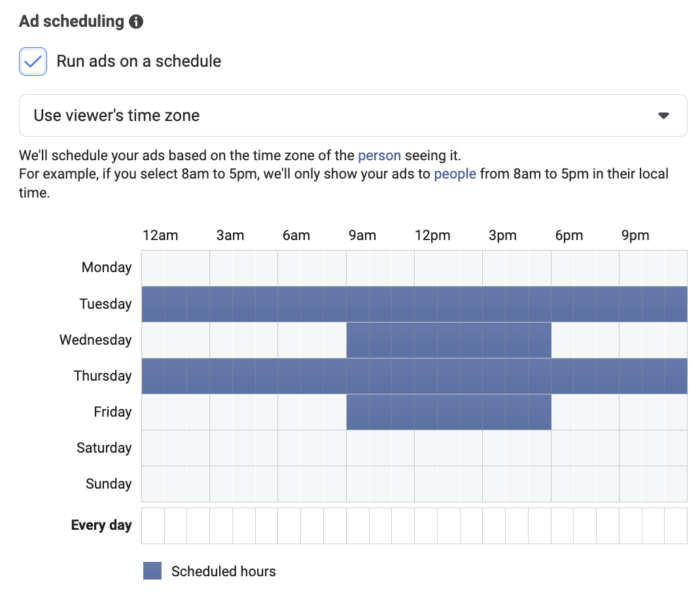
5. You Set up Dayparting
Some advertisers want their ads to only run on certain days or at certain times. If you use a lifetime budget, you can run ads on a schedule (also known as dayparting).
First, check to make sure that your ad set is supposed to run today. If you use dayparting, you may have chosen to turn it off.
Once again, restricting the algorithm can be problematic as well. Far too often, advertisers try to outsmart the algorithm. In the case of dayparting, they may choose to only run ads between 9am and 5pm during the week “because that’s when our customers are online.” Well, that’s also the most competitive time.
Your ads may struggle to deliver as a result.
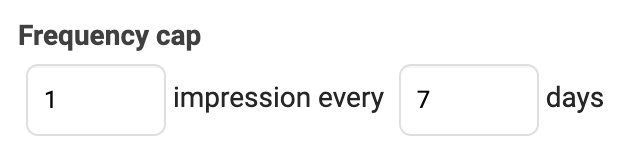
6. You Set a Frequency Cap
This is a limited situation when optimizing for Reach, but it happens. In this case, you can choose to set a frequency cap, which limits how often you reach your audience.
The default frequency cap is 1 impression every 7 days. If you use this, particularly for smaller audiences, you may notice that the ad delivers fine the first few days but then starts slowing down. Why? Because the algorithm has to wait 7 days to deliver your ads to the same audience again.
If you’re going to use Reach and this is an issue, consider adjusting the frequency cap.
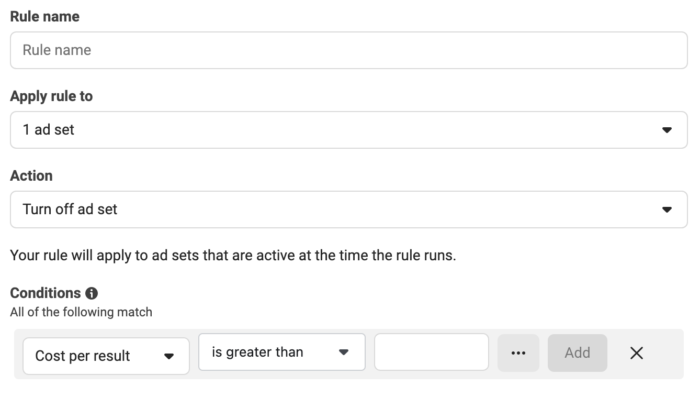
7. You Use Automated Rules
Sometimes, changes are made automatically based on rules that you set up. It may have been a rule you set up long ago that you completely forgot about.
These rules may pause your ads based on performance. Or you may automatically adjust your bid, which could impact delivery (as discussed earlier).
Make sure to check to see if you have any automated rules running and determine whether they are impacting active campaigns.
8. Performance Issues
If your ads are performing poorly, you may see delivery slow down and you may be less likely to reach your budget.
This is a good thing! And it’s a sign that you should try something else.
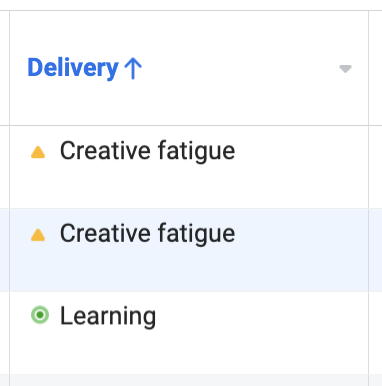
Check the Delivery Column
Oftentimes, the Delivery column will give you clues about why your ads aren’t delivering. Issues like Learning Limited and Creative Fatigue are the most common culprits that could lead to a drop in delivery.
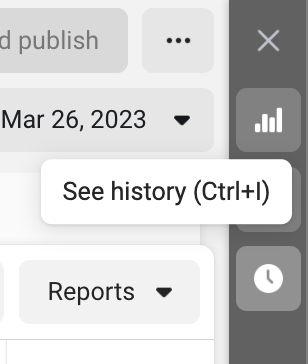
Check the Activity History
There are a couple of reasons that you should check your Activity History if delivery is an issue.
First, maybe there was a significant change or change you weren’t aware of that led to the drop in delivery.
Second, look for frequent changes or pauses that would negatively impact the delivery of your ads.
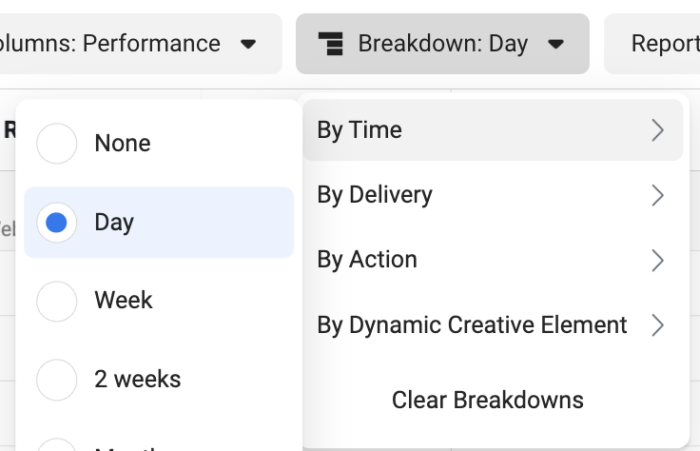
Use Breakdown by Day
Another way to isolate what went wrong is to breakdown your ad performance by day. See if you can isolate when this problem began.
You should start with those problematic dates when looking at your Activity History.
Watch Video
I recorded a video about this, too. Watch it below…
Your Turn
Do you have issues with Meta spending your ads budget? Are there any other explanations that haven’t been listed here?
Let me know in the comments below!
The post Why Won’t Meta Spend My Advertising Budget? appeared first on Jon Loomer Digital.
https://www.sydneysocialmediaservices.com/wp-content/uploads/2023/03/budget-problem-300x157-1.png157300exposurehttps://www.sydneysocialmediaservices.com/wp-content/uploads/2022/07/sydney-social-media-services-white.pngexposure2023-03-28 02:14:072023-03-28 02:14:07Why Won’t Meta Spend My Advertising Budget?
The past six months have been a heck of a journey. I went from having no experience with the format (and a negative feeling about it) to being fully committed to it after recording more than 270 short-form videos. To say that I’ve learned a few things along the way is an understatement.
This post could go much deeper than this list. But it summarizes the best it can the most important lessons I’ve learned so far.
If you haven’t started creating your own short-form videos yet, it’s not too late. I hope this will be a push in the right direction. You can do it.
Let’s go…
1. Volume First
Your primary focus should be on volume. Create. Just keep hitting record. Every time you publish a new video, you are going to learn something.
If you are publishing a video once per week, it’s going to take you far longer to learn. It’s basic math.
I published 70 videos in the first month of my journey. It was pretty frustrating and exhausting. But it was necessary.
Set a goal for at least one video per day. Truthfully, you should do more than that in the beginning if you can.
I’ll say that focusing on volume is a good long-term strategy, too. You create more videos to give you more chances to strike a nerve with your audience.
2. Don’t Let Quality Concerns Impact Creation
Here’s something you need to understand: Your audience will be virtually invisible at first. Very few people will see your videos.
Does that sound like a downer? It shouldn’t. It should be freeing.
You are going to come up with every excuse in the beginning not to create a video. You’re going to lack confidence and you will be self-conscious. You’ll worry about everything.
Don’t. Embrace that you will create some bad videos. And you won’t create good ones until you get through that stage.
Here’s the first video I created once I committed to creating videos. I embraced that I was going to create bad videos, and it’s what helped carry me through.
@jonloomer
Create stuff that sucks!
♬ original sound – Jon Loomer
Your lighting is bad? Who cares. Bad mic? So what. Don’t know how to edit? Doesn’t matter. Bad haircut? It’s fine.
By worrying about this stuff, you’re only slowing down your growth. Your videos will get better and better with time. It will get easier. But it’s not easy at first, and you need to be okay with the results.
And maybe you need to remind yourself that virtually no one will see your video anyway. And if they do, they’re often encouraging (ignore the haters, of course!).
3. Create an Evolving Routine
The main thing, in the beginning, is this: Set aside time every day for recording, editing, and publishing.
How you do things will change. You’ll become more efficient. You’ll learn how you like to do things. Do you want to batch record one day and edit on another? Do you like to do everything at once? You’ll figure that out as you go.
Your routine won’t be perfect in the beginning, but you need one. It will evolve as you sort this out and find what works best for you.
4. Focus on a Single Thought or Point
In the beginning, my videos were far more complicated than they needed to be. I was too wordy, which probably isn’t a surprise. I needed to simplify.
If you focus on a single thought or point, you can exhaust that thought or point. It also opens up opportunities for creating more videos, rather than trying to squeeze everything into one.
It should be very easy to explain what your video is about in a few words. If it’s not, it’s too complicated.
Once you realize that, it’s okay! Break it up into thoughts. You now have multiple video ideas.
5. Keep it Short
This was a lesson I learned rather quickly. I wanted to treat short-form videos like long-form videos. That’s a mistake.
Long-form videos are different. They can be casual and have a relaxed pace. Short-form videos need to be quick.
Eliminate wasted time. Your video should open without a pause and immediately provide a hook or explanation of what is coming.
Your audience is impatient. Don’t drag out a thought. Edit out unnecessary pauses and mistakes.
If you can, limit the length of your videos to about a minute. There are benefits to this beyond it being easier to consume.
First, it will work on all platforms (TikTok, Facebook Reels, Instagram Reels, Pinterest, YouTube Shorts, and LinkedIn). Now that Facebook Reels changed their time limit to 90 seconds, only YouTube Shorts caps out at 60. But one video could work on every platform.
The second is workflow. If you’re creating longer videos, you’re likely missing opportunities to break up your thoughts into multiple videos. Combined with having to edit a longer video, you are creating more work for yourself.
I’ve found that the 60-second limit also forces me to be concise and prioritize what is most important during the editing process.
6. Learn to Edit!
You won’t know how to edit your first few videos. That’s fine. Do not let that keep you from recording.
But if you’re like me, you’ll quickly realize what separates many other videos from your own: Editing.
There are two keys to editing:
1. Tighten up the message.
Remove the dead space, cut out repetition and stuff that makes less sense when you hear it back, and prioritize what is most important.
2. Grab attention.
This could be done by adding zooms and animations. Something I’ve learned to do is change the zoom on video segments that follow one another. This is one way to edit and make it seem like multiple cameras. I also add video actions to zoom in and out during shots.
Start with #1 and progress eventually to #2.
7. Equipment and Software Upgrades Come Later
I’m often hesitant to tell anyone what software or equipment I use. Not because it’s a secret, but because that decision should be customized to your needs and setup.
You will not know what equipment and software you need before you get started. Sure, you may know that you need lights, an external mic, and editing software. But what exactly you should get is not a decision you should make right away.
As time goes on, you will start to realize not just what you need but why you need it and how you plan to use it. In some cases, you may actually have all the equipment or software that you need and you didn’t even realize it.
First, you don’t need a special camera. Your phone should be fine (it’s what I use).
Second, an example of not needing to get something new while not worrying about what other people use is editing software. There are so many different applications out there for editing videos. The vast majority of their features are the same.
I use Screenflow. Truthfully, it would probably be easier if I used either Descript or CapCut for video editing. But, you know what? I’ve used Screenflow for more than a decade. I am super comfortable with it. Because of that, I know I’d be more efficient using Screenflow than another application.
You’ll find what works for you, but be patient.
8. Do Not Sell (Focus on VALUE)
If you’re a typical marketer, your first impulse will be to use short-form videos to sell your product or service. While this may make sense for limited situations, it often is the opposite.
If you are posting organically, the goal of your video should be to provide some sort of value — usually educate or entertain. Promotional organic “ads” do not work in this format.
I have to admit that once I started hearing people I follow and respect say this, it took a lot of pressure off. We’ll talk later about why it’s so hard to measure success anyway, so focusing on value is a much easier approach.
You need to grab attention within the first few seconds. If you don’t, the user will flip to the next video. Do you think a promotional video will keep their attention? Usually not.
If you’re in the teaching space like I am, this is rather easy. I use these videos to teach and inform. I build my brand, reputation, and expertise by helping others and proving that I know what I’m talking about.
Barring a few exceptions, let go of the need to sell. Your content will be much more engaging as a result.
9. Let Go of Measurement Concerns
Measurement was one of the primary stumbling blocks for me. It was one of the many things that kept me from getting into short-form video.
Links are easy. You know someone clicked your link and went to your website. Use some UTM parameters, and you can even know what someone did on your website.
Video is different. Especially if you don’t sell with your videos, measurement is largely a black hole.
You’ll know which videos were most popular (most views, longest view time, and most engagement). But that’s really it. All surface-level information.
It’s not that you should ignore these things. They are, after all, the only way you can truly track what is and isn’t doing well. But, don’t allow it to shield you from what’s most important.
I became a believer in short-form videos a couple of months into my commitment to the format. I started hearing from people who signed up for a membership or booked a one-on-one. Over and over, they’d tell me that the primary reason was my videos.
It’s not that my videos sold anything or even mentioned these products. It’s that they helped me make a personal connection with these people and reminded them on a daily basis of the value that I can provide.
This is something that can’t truly be measured. Instead, you have to believe in it and trust in it.
Measure what you can. But embrace that much of your impact won’t be measurable while still being worthwhile.
10. Do Not Be Deterred by Slow Growth
This is the hardest part. Unless you are in the extreme minority, you will not make an immediate impact.
Growth will be slow. It will be easy to get down because of it.
Resist. Remind yourself that this is part of the process.
I’ve found pretty good success in six months. I built a TikTok audience from nothing to 10,000 people. I brought my Facebook audience back to life. And I have truly tapped into my Instagram audience for the first time.
But, it’s not all a glowing success story. I’ve yet to solve the YouTube Shorts riddle. Some of my videos there have 15-20 views. And even where I’ve found success, it’s a rollercoaster of ups and downs.
Celebrate the growth, but do not let the tough times keep you down.
11. This is a Long-Term Commitment
This truly is most important. Most people will quit. They expect results within the first month or six months. It’s not easy to keep going.
You need to accept and embrace going in that this is going to be hard. You cannot look at this as something that you’ll continue only if you get early results. If that’s the case, plan to quit.
Realistically, it’s going to take you a year to see decent progress. And it might take more.
But it’s worth it. So commit to at least a year of being all-in on short-form video before you make any rash decisions.
Summary: Be Stubbornly Consistent
I talk about this in the video below, too. You must avoid the ups and downs and stay laser-focused on your goal. You must be stubbornly consistent.
No matter what your results, create and keep creating.
If everyone could do this, they would. But often what separates those who do from those who don’t has nothing to do with talent. Instead, it’s patience.
Do you have the patience to persist? Or will you quit when it gets hard? Most people will quit.
I often use the example of how I wrote about 600 blog posts the first two years of my website. It’s a similar concept. You need to be so focused on the goal of creation that nothing else matters.
Build it into your routine. Make sure it’s your priority. And keep pushing.
Your Turn
Have you gotten started yet with short-form video? What’s holding you back?
Let me know in the comments below!
The post 11 Lessons Learned from Short-Form Video Creation appeared first on Jon Loomer Digital.
https://www.sydneysocialmediaservices.com/wp-content/uploads/2023/03/11-lessons-2-300x157-1.png157300exposurehttps://www.sydneysocialmediaservices.com/wp-content/uploads/2022/07/sydney-social-media-services-white.pngexposure2023-03-23 14:54:402023-03-23 14:54:4011 Lessons Learned from Short-Form Video Creation
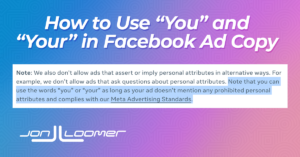
A rumor took hold of many Meta advertisers for the past several years. The claim was that you can’t use the words “you” or “your” in your Facebook ads copy without risk of rejection — or worse.
This theory never made sense to me. I use the words “you” and “your” routinely in my ad copy without any concern or repercussion. But, there has to be some reasonable explanation for why so many advertisers believe it to be true.
I decided to do some digging. And as seems to be the case with most of these theories, there is some sliver of truth. But, not surprisingly, how this rule is applied is misunderstood.
In this post, let’s better understand how this rule is applied and provide some examples of what is and is not acceptable for use of the words “you” and “your” in Facebook ads copy.
Prohibited Personal Attributes
I stumbled on this accidentally while researching prohibited personal attributes related to Facebook advertising. Here is the important passage:
Note that you can use the words ‘you’ or ‘your’ as long as your ad doesn’t mention any prohibited personal attributes and complies with our Meta Advertising Standards.
Here’s the full quote…
Let’s back up. Meta doesn’t allow advertisers to assert or imply the personal attributes of the targeted audience. Here’s the list of prohibited personal attributes:
Race
Ethnicity
Color
National origin
Religion
Age
Sex
Sexual orientation
Gender identity
Family status
Disability
Medical or genetic condition
Physical or mental health (including medical conditions)
Vulnerable financial status
Voting status
Membership in a trade union
Criminal record
Name
The problem with using “you” or “your” is when it implies that you know that the targeted audience has a connection to one of these personal attributes. You can’t suggest that you know that someone has a disability, has a medical condition, has a criminal record, or is having financial difficulties.
When you do, this is when ads get especially creepy and problematic.
Examples
Let’s go over some examples of uses of “you” and “your” that could get you in trouble, coming from Meta’s own documentation.
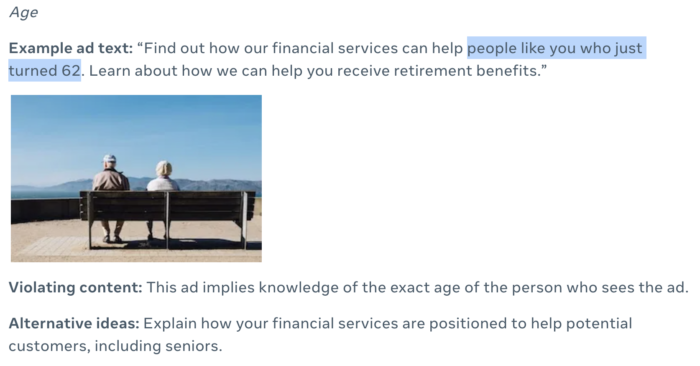
In the example above, you can’t assert or imply that you know that the targeted person is 62. That’s why using the phrase “people like you” is an issue. You can still highlight your services and how the business helps seniors, but you need to do so without suggesting you know their age.
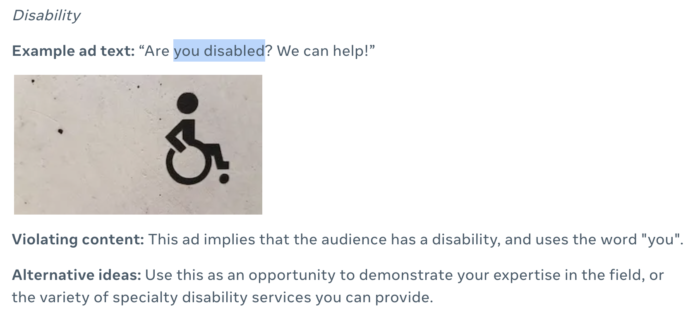
Even though the copy is framed in the form of a question, the use of “you” along with a prohibited personal attribute is a violation. Instead, highlight how your service benefits those with disabilities without suggesting the targeted person has a disability.
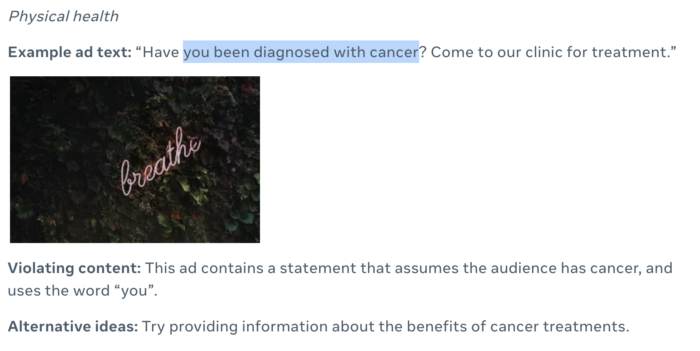
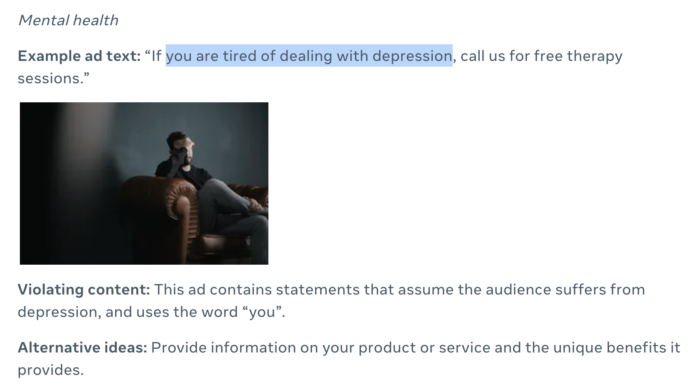
Similar to the example above, do not suggest or ask whether the targeted person has a medical condition. Instead, focus on your services.
In this example, the copy would be fine if it simply read “Call us for free therapy sessions.”
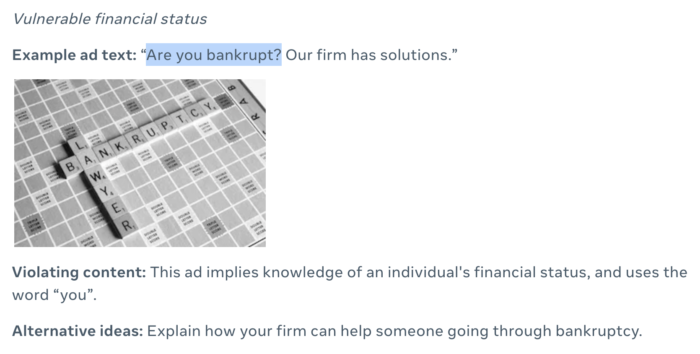
Again, it’s rather simple. Don’t personalize this. “Our firm has solutions to bankruptcy.” Highlight those solutions.
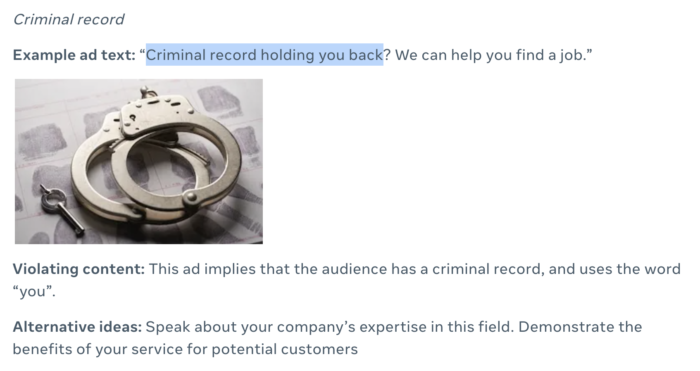
Instead of asking the targeted person whether they have a criminal record, focus on how your business helps those with a criminal record find a job.
“You” and “Your” are Normally Fine
As you read through the above, the common theme is that “you” and “your” are being used with sensitive issues. Avoid that.
There are bound to be gray areas to avoid. But that doesn’t mean you need to write awkward sentences and throw these words out entirely.
Here are some examples where it would be fine…
Are you hungry?
Are your Facebook ads performing badly?
Do you like to dance?
Do you have your tickets to the game yet?
Save your seat at this conference.
Your dreams have come true.
Do you need a plumber?
When we go through what’s not allowed, it can feel like it’s difficult to write copy that doesn’t violate terms. But as you can see, you just can’t use “you” and “your” in sensitive copy related to prohibited personal attributes.
https://www.sydneysocialmediaservices.com/wp-content/uploads/2023/03/you-and-your-300x157-1.png157300exposurehttps://www.sydneysocialmediaservices.com/wp-content/uploads/2022/07/sydney-social-media-services-white.pngexposure2023-03-14 07:47:312023-03-14 07:47:31Can We Use the Words “You” and “Your” in Facebook Ads Copy?
As I’ve jumped into this new challenge of short-form video, one little thing has nagged me: My videos weren’t appearing the way I expected them to.
This was due to a few issues that covered or impacted my video:
1. Icons displayed by the app on the right side
2. Text and descriptions at the bottom
3. Dead space at the top due to the device
4. Cropped out content on the sides
Each of these things taken separately was a minor annoyance. Taken together, they could seriously impact the viewability of your video.
These four things impacted me the most with two primary aspects of my video:
1. Captions. I like my captions big and bold, but they’d often spill off into the icons on the right or get covered by text from the app on the bottom.
2. Screen shares. I do a lot of tutorials, so it’s helpful to share my screen. But when I do this, I zoom in to see important areas that I’m talking about. I quickly realized that the sides were cropped slightly, which would make those screens more difficult to understand.
Because of this, it became obvious that I needed some sort of Safe Zone template for both TikTok and Instagram Reels. I know there are other templates out there, but I wanted to create my own instead of trusting someone else’s.
The templates below are based on what I’ve found for my actual videos — pre and post-publishing. It’s possible you may see differences depending on your device or applications that you use for editing.
I’ve found that the safe zones are similar, but not identical for TikTok and Instagram Reels.
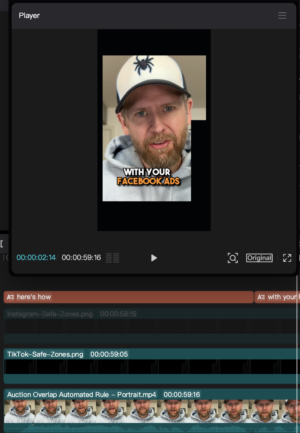
TikTok Safe Zones Template
The icons on the right tend to take up a little more room on TikTok than on Instagram Reels. There does appear to be a little bit more room on the bottom in TikTok, though.
[DOWNLOAD A COPY]
When you click the link above, you’ll download the transparent version of this template. If it doesn’t go straight to your downloads, right-click the image that does pop up to save it.
Instagram Reels Safe Zones Template
Instagram is a bit more forgiving with the room on the right for icons, but I have seen that more space is taken up with descriptive text at the bottom.
[DOWNLOAD A COPY]
When you click the link above, you’ll download the transparent version of this template. If it doesn’t go straight to your downloads, right-click the image that does pop up to save it.
How to Use the Templates
These templates are transparent in the safe portion of the image. So, add it as a layer to whatever editing software you use.
Here’s an example in CapCut.
Add the template to your Media tab and then drag it down to a layer. You can then adjust your captions or other content to fit properly within the safe zone.
Of course, you’ll want to hide that layer or remove it entirely before you export it.
Get a Video Tutorial
I’ve also put together a video tutorial of how to use these safe zone templates. Subscribe by completing the form below and I’ll send it to you.
[GET THE VIDEO TUTORIAL]
Enjoy!
The post TikTok and Instagram Reels Safe Zones Templates for 2023 appeared first on Jon Loomer Digital.
https://www.sydneysocialmediaservices.com/wp-content/uploads/2022/12/safe-zones-templates-300x157-1.png157300exposurehttps://www.sydneysocialmediaservices.com/wp-content/uploads/2022/07/sydney-social-media-services-white.pngexposure2022-12-29 05:53:172022-12-29 05:53:17TikTok and Instagram Reels Safe Zones Templates for 2023
CPM (Cost Per 1,000 Impressions) has a significant role in the performance of your ads. A dropping CPM can make a borderline campaign profitable while a rising CPM can turn a profitable campaign into a failure.
While CPM is an important factor, it’s not something you should try to control. There are simply far too many reasons for the fluctuation of this cost for you to obsess over it.
That said, what happens with global CPMs during the holidays is a popular topic. We expect CPMs to go up as competition increases. While that increase has shown to be far from guaranteed this year, it’s an important metric to track.
You’ll want to watch CPM because of its impact on your results, even if there is little control over it. Here are a couple of ways that you can monitor your Facebook ads CPM in relationship to your CPA (Cost Per Action)…
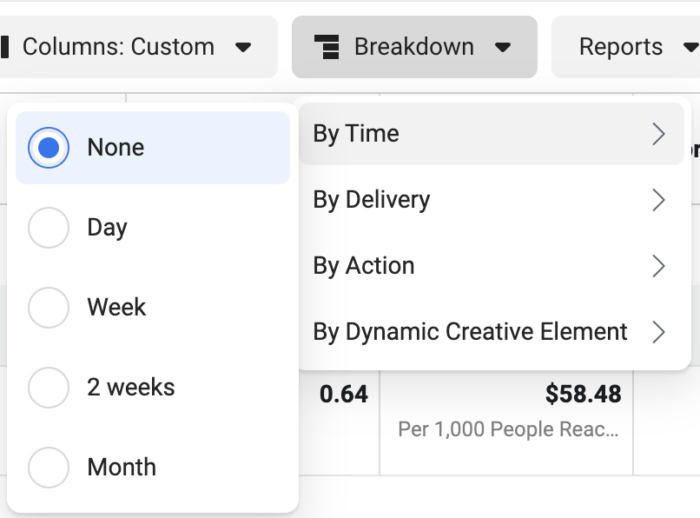
Breakdown by Time
One easy way to monitor your CPM is by using the Breakdown feature. You can breakdown by day, week, 2 weeks, or month.
When you do this, you can then get a sense of whether your CPM is increasing over time. If it is, you can then evaluate whether it’s leading to an increased CPA.
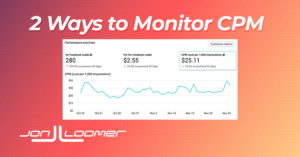
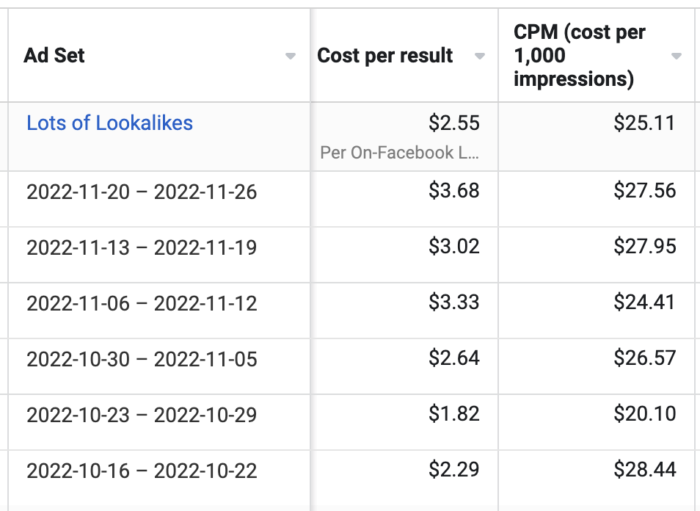
Here’s an example, using Breakdown by Week…
In this case, the average CPA and CPM are represented in the initial Totals row. Here, you can see that CPM has been up slightly over the past two weeks, which may have at least contributed to a slightly elevated CPA.
Charts
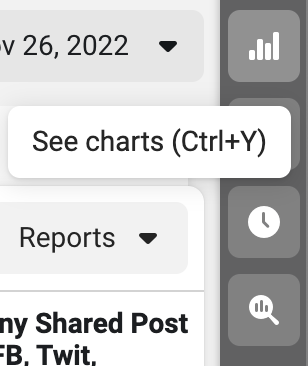
Charts is a feature that very few advertisers know about, but it can be helpful in this case. After selecting an ad set, click the “Charts” icon at the far right of Ads Manager.
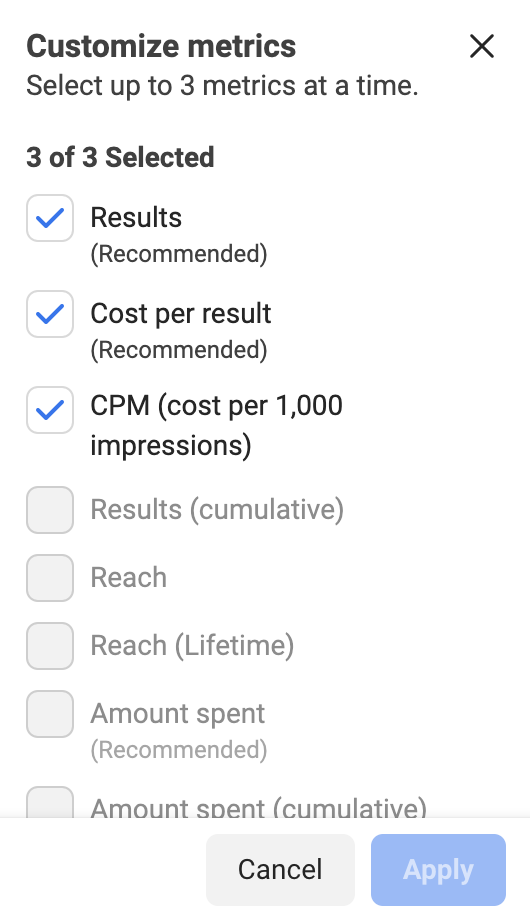
Click “Customize Metrics” at the top right.
You can only select three metrics at a time, so you’ll need to uncheck a metric to include CPM. Once you do, select it to view its chart over time.
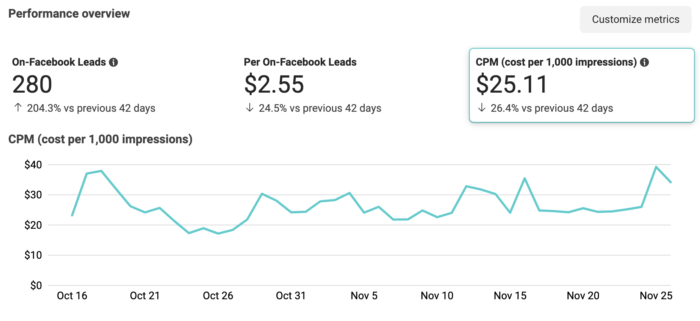
As you can see, CPM may be on the higher side when compared to the full six weeks this ad set has run, but you probably wouldn’t classify it as a “spike.”
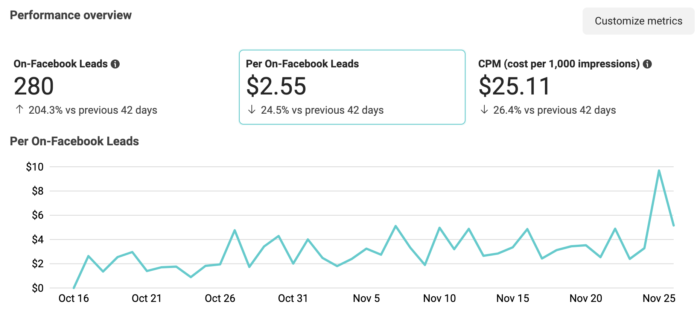
You can also then view the CPA to get a sense of whether that’s trending up as well.
Well, that’s certainly a spike! But is it a trend? We’ll need more time to be sure.
Watch Video
Here’s a quick 60-second video that helps walk through these features…
@jonloomer Two ways to check whether your Facebook ads CPMs are going up over time, leading to bad results. #facebookads ♬ Old School Boom Bap Hip-hop – Friends_House
If you haven’t yet followed me on TikTok, make sure that you do (@jonloomer)!
Your Turn
As mentioned at the top, CPM is important because it can have a significant impact on the performance of your ads. That said, do not obsess over what you need to do to get it down. Often there are factors outside of your control (like seasonal competition) that drive up the cost.
How do you monitor your Facebook ads CPM?
Let me know in the comments below!
The post Two Ways to Monitor Facebook Ads CPM appeared first on Jon Loomer Digital.
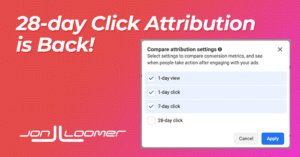
Just in time for the holidays, Meta is bringing back 28-day click attribution.
This is some of the best news advertisers have received in a while. At the moment, though, I haven’t seen anything official from Meta on the reasoning behind it, the quality of that reporting, or what it means for the future of optimization and reporting.
So, for now, let’s discuss what has happened, how it impacts your advertising, and what it could mean.
The History of 28-Day Click
Prior to iOS 14 changes, Facebook used separate attribution windows (for reporting) and conversion windows (for optimization). One major change was the move to an Attribution Setting (for both optimization and reporting) and the removal of 28-day click.
While advertisers complain of a drop in performance since these changes, I believe the blame has been misplaced on iOS opt-outs. Aggregated Event Measurement should still find many of your prioritized events. The biggest change was the loss of the 28-day click window.
When 28-day click attribution existed, we’d often get questions about whether Facebook ads reporting was inflated. But once it went away, those questions moved to panic about conversions dropping.
And it makes sense. Especially for sales of products that may take longer than seven days to make a buying decision, there’s every reason to believe that advertisers have been hurt by these “lost” conversions.
The Return of 28-Day Click
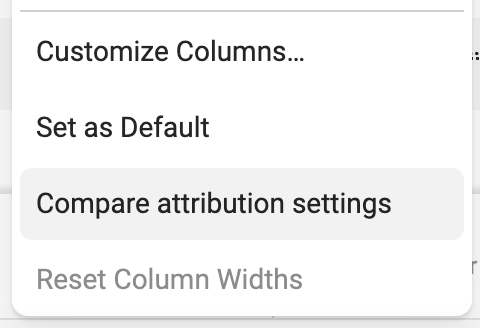
It’s been an eventful week or so. Just a few days ago, Meta brought back the Compare Attribution Settings feature. And it’s with that feature that we now see the return of 28-day click.
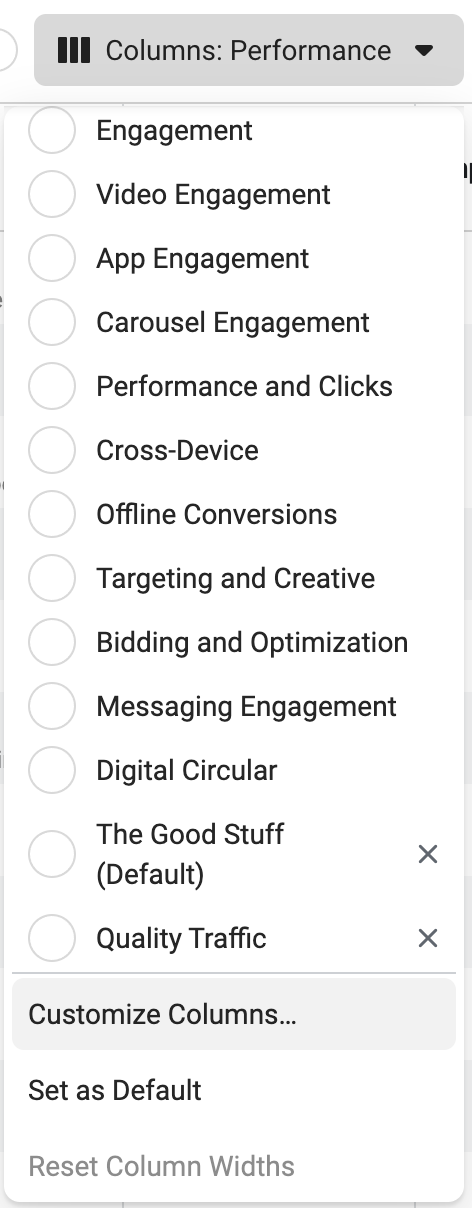
Open the Columns drop-down in Ads Manager and scroll down to “Compare Attribution Settings.”
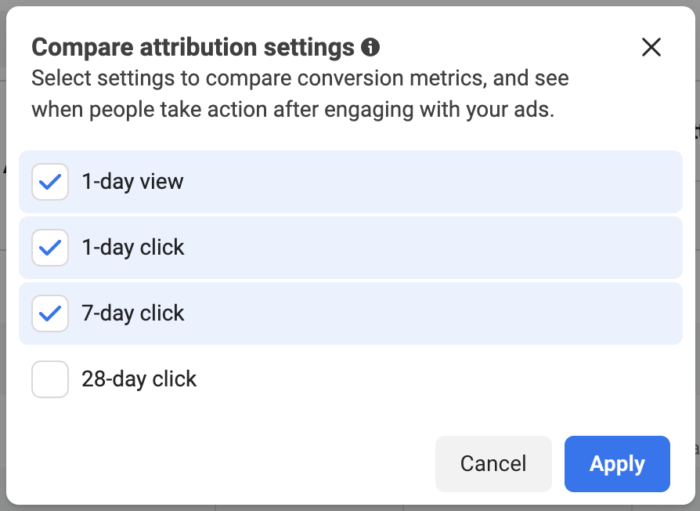
That feature now looks like this…
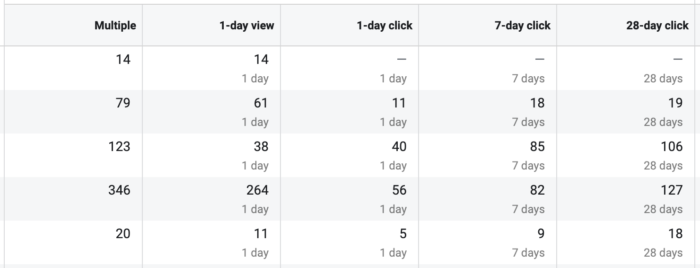
You can add a column for 28-day click to view how many conversions happened in that window, regardless of your Attribution Setting.
Optimization vs. Reporting
Keep in mind, the addition of 28-day click is only for reporting. The default reporting is still based on your Attribution Setting, which is determined in the ad set. To see the 28-day click conversions, you’ll need to use the Compare Attribution Settings feature.
If you’re wondering, nothing has changed to Attribution Settings (yet, at least). There isn’t an option for 28-day click.
If there were, this would change how your ad set is optimized to include those who converted after 28 days of clicking.
How Can This Be?
Meta got rid of 28-day click for a reason. Presumably, various privacy changes have resulted in a lack of confidence in tracking beyond seven days. So, how could they bring it back now?
Well, there is no official statement from Meta on this, so I only have some assumptions. Keep in mind that originally the Attribution Setting was 7-day click only. Meta pulled way back initially. The company has said that modeling and machine learning have improved reporting.
It’s possible, if not likely, that Facebook has always had 28-day click reporting information during the past 18 months or so. And we also shouldn’t forget that not everyone is on an iOS device. Even if Meta is unable to attribute 28-day click conversions for users who opt-out on iOS devices (not known), there’s a world of potential conversions remaining.
It would seem, though, that privacy restrictions will only get tighter in the future. Meta must feel confident that those restrictions will not hinder 28-day click attribution or they wouldn’t have bothered bringing it back.
I would understand any cynicism related to the timing of this release. You may be able to uncover more conversions just in time for your holiday campaigns. This may alter your view of the performance of those efforts.
What You Should Do
This is where advanced advertisers will separate themselves from typical advertisers. Typical advertisers won’t even know this exists. Advanced advertisers will use this to uncover more conversions and show clients the relative success of their ads.
Do not be afraid to use this. Understand that the customer journey often takes longer than seven days after a click.
Watch Video
I also recorded this short video about the return of 28-day click. If you aren’t following me on TikTok yet, please do!
@jonloomer 28-day click attribution is back for Facebook ads! #facebookads ♬ Zodiac | Seamless Looping Trap Hip Hop Instrumental – xklbeats
Your Turn
Do you have this update? What do you think?
Let me know in the comments below!
The post Meta Brings Back 28-Day Click Attribution appeared first on Jon Loomer Digital.
If you’re a Facebook advertiser, one of the most underutilized features that you may not even know about is the Custom Metric. I wrote about it two years ago, and it’s an option that largely escapes advertisers.
I want to take a second look at custom metrics today and provide two specific examples of how I use them.
What Are Custom Metrics?
I don’t want to reinvent the wheel by writing another tutorial on custom metrics here. But, it’s important that you understand what we’re talking about.
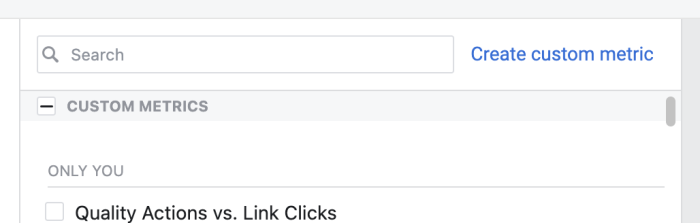
Custom metrics allow you to combine metrics in a formula to uncover information that Facebook won’t provide natively. You can create custom metrics in either your custom ad reports or within Ads Manager itself. Where you create the custom metric doesn’t matter. The actual process is the same and those metrics can be used across both locations.
Within custom ad reports, you’ll see the option within “Metrics” on the right…
And within Ads Manager, you can see the option to create a custom metric when you customize columns…
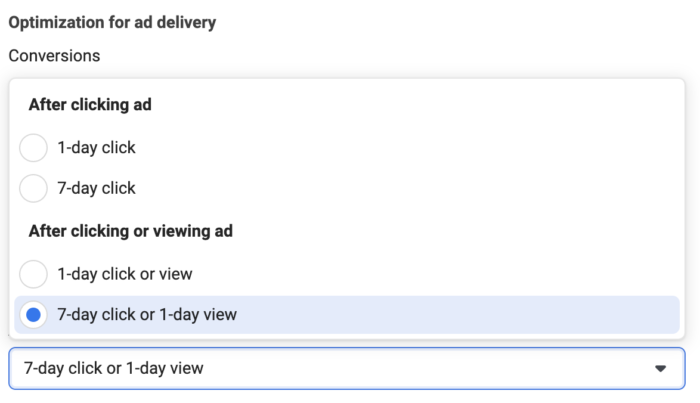
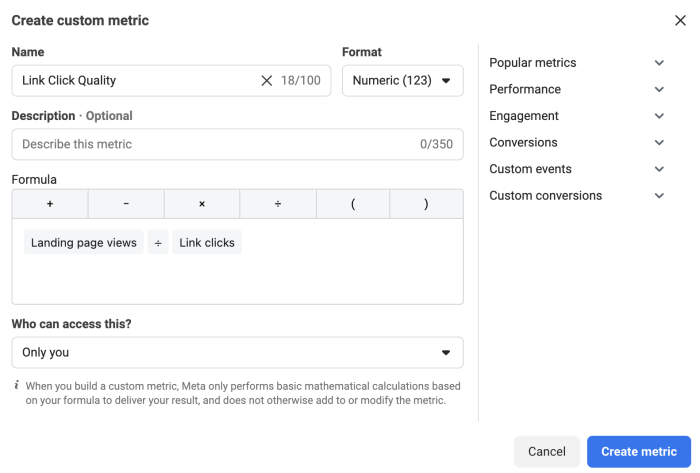
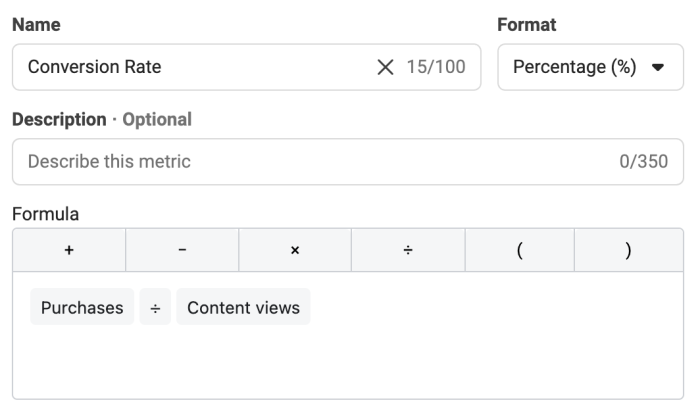
Here’s a really simple example. You may want to monitor the quality of traffic you’re sending by calculating the ratio of Landing Page Views over Link Clicks.
You can then select these custom metrics when adding columns to your report.
Why Would You Use Custom Metrics?
Before we get to a couple of examples, let’s dig a little deeper into why custom metrics are important.
There are times when the metrics available don’t provide the necessary insight that you need. This can be critical to properly evaluate the performance of a campaign.
The metrics that you use and care about most should be simple in many cases. For example, if you are optimizing for a purchase, you should care most about the number of purchases, the cost to get those purchases, and maybe the ROAS. These metrics are all built-in.
But, what about if that campaign isn’t effective? Is it due to the conversion rate? Facebook offers some metrics like Result Rate and Conversion Rate Ranking, but they don’t provide a rate for the number of Conversions compared to View Content, for example. This would show the number of people who converted over those who hit the landing page.
The most glaring need for custom metrics, though, is related to efforts to drive engagement and traffic.
Engagement Score
If you run an engagement campaign, you’ll likely optimize for something like Video Views or Post Engagement. Post Engagement as a metric, though, includes multiple metrics that are treated equally.
We don’t want that. We know that some metrics are more important than others. A Share, for example, can lead to many more people seeing your post. A 3-second video view could be due to auto-play, which may have no impact on the user.
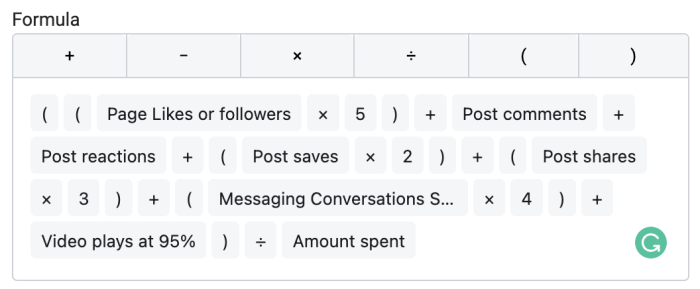
So, we can create a formula that weights each type of engagement differently. Of course, how we weight each type of engagement is somewhat arbitrary, and it will be different from advertiser to advertiser. Here’s an example of what you might use for a Post Engagement Score:
In this example, I combine several prioritized engagement metrics and apply different weights based on what I think is most important. I then divide that sum by the total spent.
Here’s a summary of weights:
Page Likes or Followers (5)
Messaging Conversations Started (4)
Post Shares (3)
Post Saves (2)
Post Comments (1)
Post Reactions (1)
Video Plays at 95% (1)
I used amount spent because the cost to get all of these things is more important to me than the actual rate. But, how you build these custom metrics is completely up to you.
Traffic Score
One of my biggest peaves with Facebook is that there is so little focus on driving and measuring quality website traffic. If you rely on Facebook’s metrics alone, the “Result” which determines success will be link clicks or landing page views. But, what if we created a custom metric that better reflects the quality of that traffic?
From a basic level, you could build a custom metric based only on the information that Facebook provides (landing page views and standard events). I’m not going to include bottom-of-the-funnel metrics like purchases in this case because the primary focus here is on traffic actions (but do what you want).
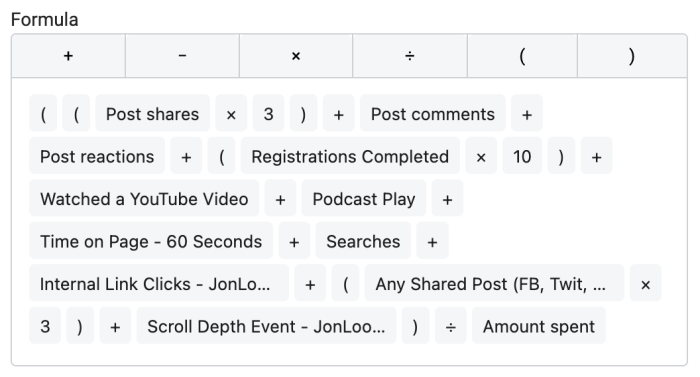
But, a custom metric can get really interesting if you use custom events like I do. Here’s an example of a custom metric that I built to measure the quality of traffic…
Here’s a breakdown of the metrics I’ve used and their weights:
Registrations Completed (10)
Post Shares (3)
*Any Shared Post (3)
Post Comments
Post Reactions
*Podcast Play
*Time on Page – 60 Seconds
Searches
*Internal Link Clicks
*Scroll Depth Event
*Watched a YouTube Video
Notice I’ve included some on-post engagement that I find important like shares, comments, and reactions. Everything else occurs on the website itself.
The metrics marked with an asterisk (*) are all custom events that I’ve set up. So, I measure when someone clicks to share directly from my website to Facebook, Twitter, LinkedIn, or email. I also measure media plays (podcast player or embedded YouTube video), internal link clicks, time spent, and scroll depth. I include the Searches standard event, as well.
All of these things, in my mind, reflect a quality website visitor. I can certainly add columns to my Ads Manager reporting to include each metric (and I do). But, it’s incredibly helpful to include a column for one score that accounts for all of them.
I manage different websites that utilize different custom events. Because of this, I create unique Website Engagement Score metrics for each one.
Your Turn
Do you create custom metrics? What are some examples?
Let me know in the comments below!
The post Example: How to Use Custom Metrics in Facebook Ads Manager appeared first on Jon Loomer Digital.
https://www.sydneysocialmediaservices.com/wp-content/uploads/2022/09/custom-metrics-featured-300x157-1.png157300exposurehttps://www.sydneysocialmediaservices.com/wp-content/uploads/2022/07/sydney-social-media-services-white.pngexposure2022-09-15 05:17:562022-09-15 05:17:56Example: How to Use Custom Metrics in Facebook Ads Manager
Meta recently announced several new features and enhancements that are coming to lead ads and messaging. I wrote about Marketing Messages from Meta Business Suite yesterday.
Today, let’s cover the new features related to lead ads. Admittedly, Meta doesn’t provide a ton of details with most of these, but we’ll cover what we know.
1. Lead Filtering
Regardless of whether you’ve used lead ads before, the struggle with lead quality is real. You can collect a bunch of leads, but you need these people to actually buy something.
Historically, the low quality of leads has been a knock on Facebook lead ads. Because it’s so easy to complete an instant form (basic contact information can be auto-populated from the user’s profile), users sometimes don’t even recall opting in.
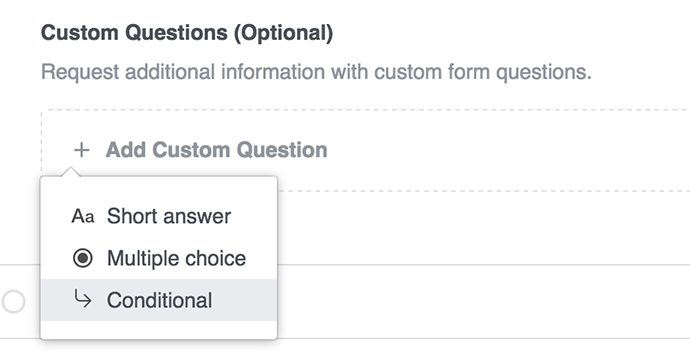
This update could help. Meta says that you’ll soon be able to use responses to a multiple-choice question to help filter leads.
Now, we don’t have any other details beyond that. You may be familiar with Conditional Answers with lead ads, and this sounds a lot like that (following is an example of Conditional Answers, not Lead Filtering).
According to the way Lead Filtering is being presented, it’s a completely new feature that isn’t yet available — and may not even be getting tested right now.
With so little info to go off of, there’s plenty that we could speculate on here. But we’ll hold off for now.
2. Gated Content
Another feature that is coming to lead ads is Gated Content. Meta says that businesses will be able to offer exclusive content for people who complete a lead form. The example that they give is downloading a brochure or product pricing for a car.
The key here is that the download would happen directly from the lead form, rather than redirecting to your website. This is a key distinction because this otherwise doesn’t sound unique.
Yes, you can currently use a “Download” CTA button on the completion screen when someone completes your lead form. But, that button cannot instantly start a download or direct to a PDF or image file.
Right now, it must direct to a page on your website where the subscriber would then execute such a download, presumably.
The way this new feature reads, it sounds like Meta would host the file and someone who opts in could immediately download it without going to your website.
Of course, there could be pluses and negatives to Meta hosting the file. On the positive side, the user gets what they wanted right away — that could be good, at least for user experience. On the negative side, you may prefer to send the thing that users wanted via email. That way, someone can’t get that free thing by providing a fake or inactive email address.
Still, there could be value from this feature in the right situation. And there is still so much unknown about how it will work that we’ll need to hold off on making too much of these concerns for now.
3. Creative Flexibility
The final feature that’s coming to lead ads is Creative Flexibility.
It sounds like Meta is testing a more flexible and personalized lead form that will allow you to add more visuals to it. Right now, there are limited options for adding visuals to your form.
Once again, I haven’t seen this yet in the wild, so we’ll just have to wait.
Your Turn
All of these features have some potential, but there’s still so much that we don’t know.
Do you have access to any of these yet? What do you think?
Let me know in the comments below!
The post Lead Filtering, Gated Content, and Creative Flexibility Coming to Facebook Lead Forms appeared first on Jon Loomer Digital.
https://www.sydneysocialmediaservices.com/wp-content/uploads/2022/06/lead-ads-features-300x157-1.png157300exposurehttps://www.sydneysocialmediaservices.com/wp-content/uploads/2022/07/sydney-social-media-services-white.pngexposure2022-06-03 04:10:202022-06-03 04:10:20Lead Filtering, Gated Content, and Creative Flexibility Coming to Facebook Lead Forms
If you run Instant Experience ads, how do you measure success? Facebook has added metrics that may prove helpful.
In this post, I’ll help you find those metrics and understand what they all mean.
Let’s go…
Access the Metrics
You’ll need to add columns to your Ads Manager report.
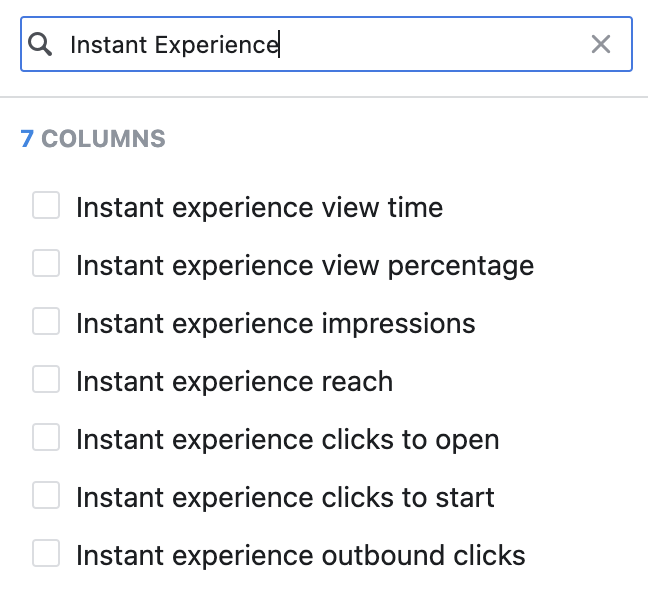
Click the “Columns” dropdown in Ads Manager and select “Customize Columns.”
Run a search for “Instant Experience.” You’ll see seven metrics…
What the Metrics Mean
Following are the metrics related to Instant Experience measurement and what they mean…
Instant Experience View Time: “The average total time, in seconds, that people spent viewing an Instant Experience.” This is similar to video view time metrics for measuring an engaged user. (SIDE NOTE: I’d love to see this for Landing Page Views and traffic metrics.)
Instant Experience View Percentage: “The average percentage of the Instant Experience that people saw.” These ad units can scroll through multiple components. If your more important components are at the bottom, a higher percentage would be a priority.
Instant Experience Impressions: “The number of elements viewed in an Instant Experience.” This one confuses me a bit. While my assumption would be that an impression would be opening an Instant Experience, that metric is coming up. Instead, this seems to be related to the number of components that you see (similar to the percentage).
Instant Experience Reach: “The number of people who viewed elements from an Instant Experience at least once.”
Instant Experience Clicks to Open: “The number of clicks on your ad that open an Instant Experience.” (This metric is in development)
Instant Experience Clicks to Start: “The number of times an interactive component in an Instant Experience starts.” This will typically be a video. (This metric is in development)
Instant Experience Outbound Clicks: “The number of clicks on links in an Instant Experience that take people off Facebook-owned properties.” Instant Experiences are often used to warm up an audience before sending them to a product page on the advertiser’s website. (This metric is in development)
What About Audiences?
This may be bit off-topic, but I can’t ignore it.
I wrote about the need for more targeting options due to iOS 14+ changes in another blog post. That includes audiences related to Instant Experience engagement.
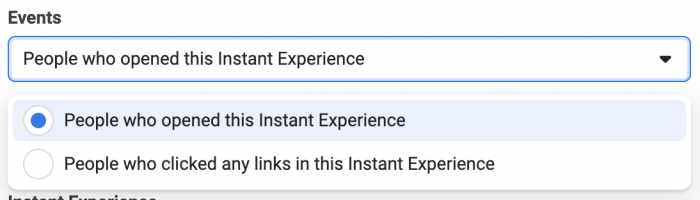
Right now, Instant Experience audiences only include the following:
People who opened your Instant Experience
People who clicked a link within your Instant Experience
That’s it!
It’s not as if Instant Experience is some new format. It’s been around long enough for Facebook to develop this further. And there are so many options for audience building — based on these seven metrics alone — that could provide some great options for advertisers.
Facebook is clearly collecting and storing this information. Why not allow us to target based on it?
Your Turn
How do you measure the success of your Instant Experience ads?
Let me know in the comments below!
The post Success Metrics for Facebook Instant Experience Ads appeared first on Jon Loomer Digital.
If you manage ads for clients, you may need to get approval prior to the ads going live. How do you create and share these mockups?
There are two primary ways that I recommend. What you use depends on your needs and comfort level.
Let’s discuss…
1. Share an Ad in Draft
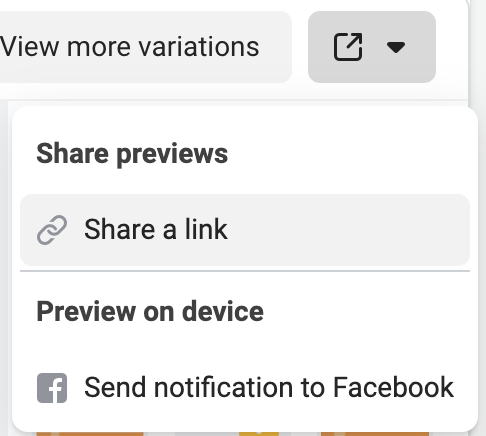
Once you’ve created an ad that is in “draft” status, you can share it.
At the top right, click the drop-down that will give you an option to “Share a Link.”
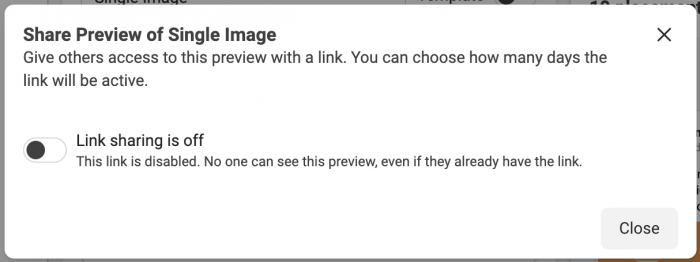
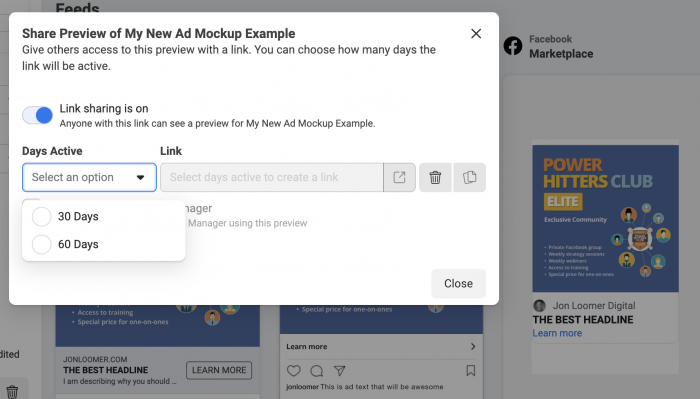
You’ll then be able to give others access to that preview by toggling link sharing “on.”
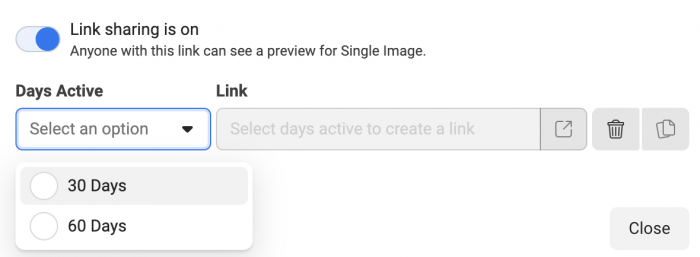
Once you turn link sharing ON, you’ll be able to determine whether the preview link can stay active for 30 or 60 days. Your sharable link will expire after that period of time.
You will then be given a link that you can share with your client.
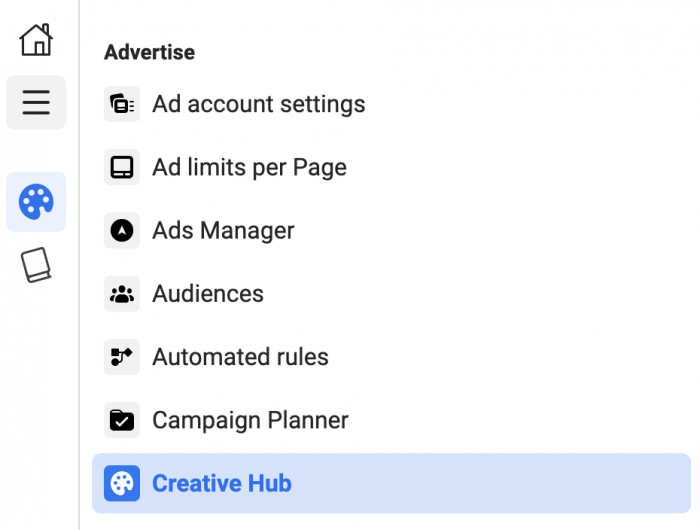
2. Use Creative Hub
If you go to the hamburger menu at the top left of Ads Manager, you will find Creative Hub within the Advertise section.
There, you can create a mockup in much the same way you’d create an ad.
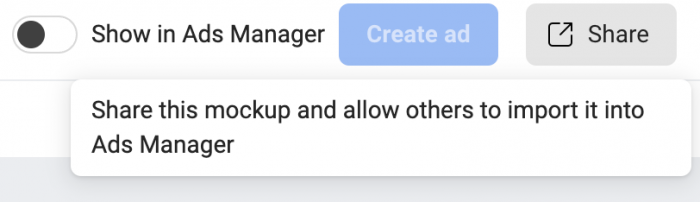
When you’re done, you can share that mockup with your client.
You’ll again need to turn link sharing on in the same way as before.
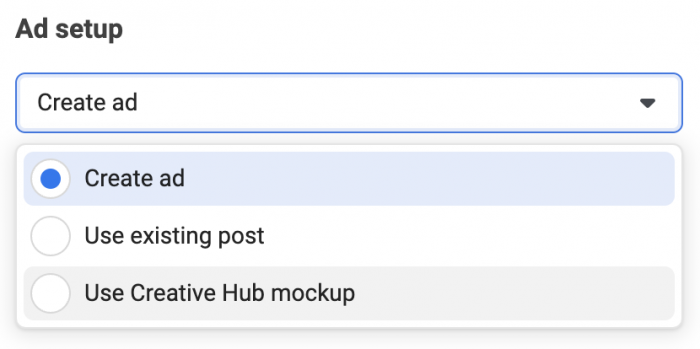
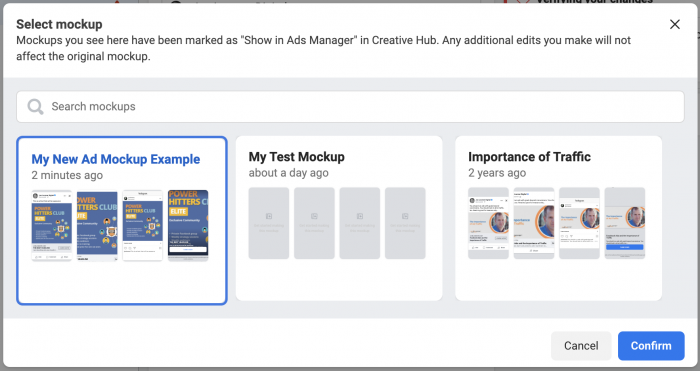
If your client approves the mockup, you can then toggle “Show in Ads Manager” within that mockup in Customer Hub.
Then, when you create an ad in Ads Manager, you’ll have the option within Ad Setup to “Use Creative Hub Mockup.”
You will then be able to import the mockup into your ad.
Advantages and Disadvantages
Like everything, each approach has its own advantages and disadvantages.
The one limitation of Creative Hub is that not all formats are available (lead forms and Instant Experience, for example).
The primary limitation of sharing ad drafts is that you’ll need to keep your ad in draft while your client reviews it. This can get complicated when you publish other ads since you’ll need to make sure to keep that ad in draft. But, of course, you’ll be able to create any ad format in this case.
Your Turn
How do you share ad mockups with clients?
Let me know in the comments below!
The post Customer Hub and Drafts: How to Share Facebook Ad Mockups with Clients appeared first on Jon Loomer Digital.
https://www.sydneysocialmediaservices.com/wp-content/uploads/2022/05/ad-mockups-300x157-1.png157300exposurehttps://www.sydneysocialmediaservices.com/wp-content/uploads/2022/07/sydney-social-media-services-white.pngexposure2022-06-01 03:26:422022-06-01 03:26:42Customer Hub and Drafts: How to Share Facebook Ad Mockups with Clients